Tampilkan postingan dengan label tutorials. Tampilkan semua postingan

How To Moving Your Blog From Blogger To WordPress Without Losing Traffic And SEO

Posted by tris tecno Rabu, 14 Desember 2011 0 komentar
Moving from blogger to wordpress has quite lots of advantages ranging from better SEO to freedom to do ‘whatever’. That’s not the main issue here and I suggest you read this post if you’re wondering whether you need to use wordpress or blogger. If you’ve already made up your mind and want to move your blog posts and comments from blogger to wordpress without breaking anything, read on.
We’re surely achieving four major aims by doing this:

1. Moving all blog posts and comments

2. Maintaining all links without generation any error 404

3. Retaining feed subscribers, posts facebook likes and tweets

4. Maintaing your traffic and google pagerank

Seriously, importing your blog posts from blogger to wordpress and so simple and you should be done in just a few minutes if you followed everything correctly. Hey, I’m assuming your blogger’s blog is already hosted under a custom domain, right? If you’re still using a blog spot sub domain, it might be a bit difficult achieving all the four goals set above. The only thing you can do in such case is to redirect your blogspot site to your new domain on wordpress but this isn’t even ideal. The best way to migrate is when you already have blogger’s blog pointed to a custom doamain, the domain you’re gonna be using for your wordpress site.

You still don’t understand? Well, my blogspot site was www.doncaprio.com, ok? And I chose to move my stuffs from blogger to wordpress still using the same www.doncaprio.com. All the goals set above would have been impossible to meet if I was using doncaprio.blogspot.com, the only thing I could do was to redirect traffic from doncaprio.blogspot.com to www.doncaprio.com.

The move is super easy if you already have your blogspot site running on a custom domain for a long time.

Alright, enough of the story and back to the real business!

1. If your blogspot site is using the same domain you want to use for your new wordpress blog, go to blogger settings and revert back to publishing under blogspot sub doamin.

2. Set your DNS entries to point to your hosting account and Install wordpress. It’s easier doing it using the auto installer on your cPanel. Log in to cPanel and locate Fantastico Deluxe, Simple Scripts, Elephante Installer or any other one-click installer provided by your web host.

3. From your WordPress Dashboard, go to Settings > Permalinks and then select Custom Structure option. Paste the following value next to it and save changes.

/%year%/%monthnum%/%postname%.html

The main essence of this is to keep your permalinks intact, making them look like blogger URLs. Personally, I won’t advice you to use something different at this time but you can definitely change it later. I’m not sure I’m gonna change mine because it means reverting facebook like counts back to zero whereas I have a single post with almost 700 facebook likes! :) I don’t wanna lose that :(

4. The next step is importing your blog posts from wordpress to blogger. Go to Tools -> Import options and select Blogger options.

5. A pop-up box will appear, click on Install Plugin to install the importer plugin in WordPress.


6. Click on Activate Plugin & Run Importer. You’re asked to grant access to your google account. Click on Grant Access and you may be prompted to login to your google account if you’re not already signed in.


7. Once you grant access, you will be taken back to the Blogger importer on WordPress. If you have more than one blog on your Blogger account, you will see all of them listed here. Just click on the import button next to the blog that you want to import into WordPress.


8. Now you have to wait for some minutes because the time it’s going to take depends on the number of posts you have. I imported 271 posts and over 1000 comments in less than five minutes.

At this point, you should note that only blog posts and comments are imported, your static pages are not imported. You have to do this manually.

If the import button changes to continue, hit the button till the process completes and Set Authors is displayed on the button.

9. You can now refresh your wordpress blog and see your posts on blogger show up. Wait a minutes, we’re not done here.

10. In step 3, we configured wordpress permalinks to look similar to blogger permalinks in order to retain traffic and search engine optimization, right? There’s likely to be a little problem though – wordpress links may look a bit longer than your original blogger permalinks.

http://www.yourblog.com/2011/how-to-move-you-blog-posts-from.html

It’s gonna look like this when it becomes a wordpress permalink:

http://www.yourblog.com/2011/how-to-move-you-blog-posts-from-blogger-to-wordpress-without-losing-traffic.html

Both permalinks have the same structure but the slug is different and we must make it look exactly like it was on blogger in order to make search traffic point to that very blog post instead of your visitors getting Error 404 (Not Found).

Copy the code below to a notepad and save it as fixlinks.php

<?php
require_once(â??wp-load.phpâ??);
$res = $wpdb->get_results(â??SELECT post_id, meta_value FROM $wpdb->postmeta WHERE meta_key = â??blogger_permalinkâ??â??);
$wpdb->print_error();
foreach ($res as $row){
$slug = explode(â??/â??,$row->meta_value);
$slug = explode(â??.â??,$slug[3]);
$wpdb->query(â??UPDATE $wpdb->posts SET post_name =â??â?? . $slug[0] . â??â?? WHERE ID = $row->post_idâ??);
$wpdb->print_error();
}
echo â??DONEâ??;
?>

11. Now upload this to your public_html or the folder in which your wordpress blog is installed. Run the script like this: http://your-blog.com/fixlinks.php

The moment you do this, you should see DONE written on your computer screen. That’s all, the permalinks are now fixed.

You can run a search on google for your old blog posts and click on it to verify if everything is working fine.

Moving Your Blogger Feed Subscribers Over To WordPress

If you’ve been using feedburner on your blogger’s blog, all you need to do is to log in to your feedburner account and edit feed details with the new wordpress RSS feed. Your subscribers count remain intact but it’s a different case if you haven’t been using feedburner.

If you’re not using feedburner, you’re going to redirect your old blogger RSS feed address to WordPress RSS feed URL by editing your .htaccess file and pasting the following piece of code on the first line:

#ATOM Feeds
RewriteRule atom.xml feed/atom/ [L,R=301]
RewriteRule feeds/posts/default feed/atom/ [L,R=301]
#RSS FEEDS
RewriteRule feeds/posts/default?alt=rss feed/ [L,R=301]
RewriteRule rss.xml feed/ [L,R=301]
#Comments Feed
RewriteRule /feeds/comments/default comments/feed/ [L,R=301]
RewriteRule /feeds/comments/default?alt=rss comments/feed/ [L,R=301]

Retaining Facebook likes, tweets and other sharing counts

If you intend to change you sharing counts, then you won’t have to change your permalinks. I wanted to change my permalinks to a much nicer one but realized my facebook likes on blog posts reverted back to zero and there was absolutely no way to fix it despite running frantic searches on google.

Removing Your Old blogspot Site From Google Index

First and foremost, I must warn you never to delete your blogger’s blog because your blog images are still hosted on blogger. Notwithstanding, you must remove your blogspot site from google’s index. Why? Having similar contents on the same blog can get you penalized by google and drop your search engine ranking. To remove your blogspot from google, paste this code in the head section of your blog

<meta content=â??NOINDEX, NOFOLLOWâ?? name=â??ROBOTSâ??/>

Now you’re done. Log in to your wordpress blog, get used to the interface and install cool plugins!

Know Issues With Migrating Blog Posts From Blogger To WordPress

While importing my blog posts, I encountered a problem which someone else might come across and that was on Step 6. I saw exactly this error:

The page you have requested cannot be displayed. Another site was requesting access to your Google Account, but sent a malformed request. Please contact the site that you were trying to use when you received this message to inform them of the error. A detailed error message follows:

The site “http://example.com” has not been registered.

The fix for this is registering your domain with google to access all google’s services by following this link: https://www.google.com/accounts/ManageDomains

- Enter your domain name in the box provided, ex., doncaprio.com

- Click on Manage Domain

- Select Alternate Method which is much more easier if you don’t want to mess around with DNS settings.

- You wil be given an HTML file to upload after which you will click the Verify button.

- Add your domain name and description and save

- Save OAuth key and OAuth secrete for your future reference

- Now you domain is registered

How To Change Blogger’s Post Title Format

Posted by tris tecno 0 komentar
If you are one of those with long page titles, you sure won’t like the way your blog shows up on search results with your post title looking so wierd.

By default, blogger’s posts title always places your whole site title before the real post title. If your site title is too long, your real post title containing your keywords might not show up on search results.


Now check this example: here’s a blog with site title as “Tips And Tricks on Building A Better Blog, SEO and Online Money Making” and a blog post titled “How to Make Money Reading Mails“

By Default, the Post title appears like this:

(Tips And Tricks on Building A Better Blog, SEO and Online Money Making : How to Make Money Reading Mails)

But after going through this tutorial, the title will look like this:

(How to Make Money Reading Mails | Tips And Tricks on Building A Better Blog, SEO and Online Money Making)

The second title definitely looks better as the subject matter of the blog post is easily seen. This is also good for search engine optimization. This blogger title swap is a must-do hack for your blog.

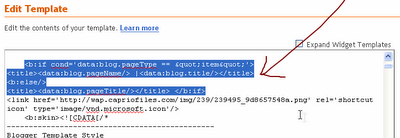
1. To change the title, Go to “design”

2. Select “Edit HTML”

<title><data:blog.title/></title>

If you can’t find that, search for this:

<title><data:blog.pageTitle/></title>

4. Replace completely with:

<b:if cond='data:blog.pageType == "item"'>
<title><data:blog.pageName/> |<data:blog.title/></title>
<b:else/>
<title><data:blog.pageTitle/></title> </b:if>


5. Save your template.

6. View your blog and watch the title swap change your post title format

Now this won’t reflect immediately on search engines as your indexed pages will only be updated when search bots come visiting.

How to show HTML/java codes in blog posts "For Blogger"

Posted by tris tecno 0 komentar
If you’re a blogspot platform blogger and want to show HTML source codes in your blog posts then you must had a hard time how to make it done.


For fix this you have to take two simple steps,

Step 1

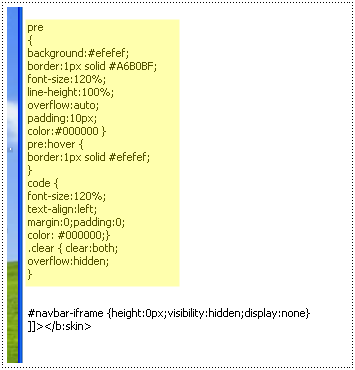
You have to add a special code inside your blogger template. Go to your blogger Dashboard > Layout > Edit HTML. Now hit CTRL+D on your keyboard and search this tag,

]]></b:skin>

Now you have to add this code above that code,

Source BlogKori.Com : How to show HTML/java codes in blogger(blogspot) blog posts with table + Raw HTML converter | BlogKori
Under Creative Commons License: Attribution Share Alike

pre
{
background:#efefef;
border:1px solid #A6B0BF;
font-size:120%;
line-height:100%;
overflow:auto;
padding:10px;
color:#000000 }
pre:hover {
border:1px solid #efefef;
}
code {
font-size:120%;
text-align:left;
margin:0;padding:0;
color: #000000;}
.clear { clear:both;
overflow:hidden;
}

Now it will look something like this,
 

After you done it, click the “Preview” button to see if your blog shows or not. If everything’s okay, then click, “Save template“

Step 2

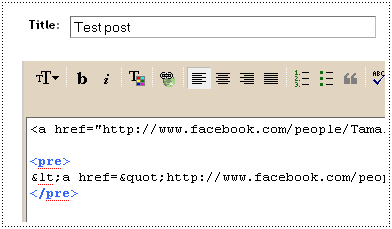
Now each time you create a post and you need to add some HTML codes inside your post, you have to convert it into escapable characters. For this go to this tool called Quick escape and insert your code. Click, “Convert to escaped character” the converted code will be different than the original.

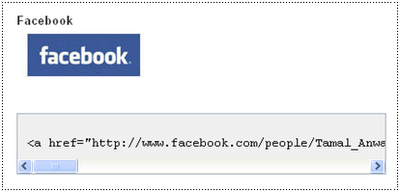
Now create a new blog post and add the converted code. You have to enclosed the code with a “pre” tag(marked as blue) For this I’ve added the same code twice. One normally and the other one with the hack.


Publish your post and see the magic! The normal code showed up with the effect but the hacked on remained intact inside the table.


Please leave a comment with your response and any suggestion for this blogger hack. If you run into any trouble, feel free to ask me a question. Please do share/save this page if it helped you.

Adding Facebook Like Button To Blog Posts (For Blogger)

Posted by tris tecno 0 komentar
Facebook like button is probably the most important facebook integration to socialize your blog. It allows your blog content to be shared with the click of a button without leaving the page. I recently wrote a post on creating a facebook fan page and adding a like box to your blog and I suggest you check it out if you haven’t. Adding facebook like button involves just a couple of steps easy to implement.
You can add a like button for your fan page or a like button for each and every blog post. There’s an old post I made on adding facebook like button to blog posts but this one explains it even further.

ADDING LIKE BUTTON TO EACH BLOG POST

This makes it a lot easier for your readers to share your blog posts with just a click. To add facebook like button to every blog posts automatically, follow the steps below:

1. Login to your blogger account and select Design

2. Click on Edit HTML

3. Check the box labelled Expand Widget Template

4. Like I always emphasize, back up your template before making changes in case something goes wrong

5. Press CTRL + F and search for <data:post.body/>

If you’re using a magazine style template or used the automatic read more hack I posted, you might find two or more <data:post.body/> in your template. You should try both to know which one works. The second works on my template though.

6. If you prefer to have the facebook like button to appear on top of your blog post right below the title, paste this code above <data:post.body/>

<b:if cond='data:blog.pageType == &quot;item&quot;'><div><iframe allowTransparency='true' expr:src='&quot;http://www.facebook.com/plugins/like.php?href=&quot; + data:post.url + &quot;&amp;layout=standard&amp;show_faces=false&amp;width=100&amp;action=like&amp;font=arial&amp;colorscheme=light&quot;' frameborder='0' scrolling='no' style='border:none; overflow:hidden; width:400px; height:27px;'/></div></b:if> <br/>

7. If you prefer to see the like button below your blog posts, paste this code below <data:post.body>

8. You might as well put it in both positions. Save your template and view the change on your blog.

Note:
You can change the layout written in red which is set to standard by default to button_count if you want the like button to show number of likes instead.

You can as well set show_faces which is false by default to true. This enables the like button to show photos underneath but it applies to the standard button only.

The code above too only shows the like button on post pages. It won’t appear on static pages like label search results and home page. To make the like button appear on static pages involves removing two lines of codes: <b:if cond=’data:blog.pageType == &quot;item&quot;’> and </b:if>.
With those removed, the facebook like button appears on static pages and on blog post pages as well.

How to enable nofollow links on intense debate comments

Posted by tris tecno Senin, 15 November 2010 0 komentar

Among the two popular commenting system Intense Debate was there, with millions of users. Intense Debate comments basically looks good with cool features and plugins. However, there is a little drawback in the commenting system and that is lack of nofollow option. Since spammers take advantage of dofollow comments blog for a link back, why do we need to give a backlink for a spammer? Literally you shouldn’t allow that. So, here is a little tweak to make both the avatar link and the link that comes inside the comment box nofollow.


To disable nofollow links, I am using the script made by Thaya Kareeson using his jQuery code to add nofollow to external links. Download this javascript and upload this on your own server. If you dont have your own server, you can use my link.


<script src='https://sites.google.com/site/bloggermint/nofollow.js' type='text/javascript'/>

For WordPress – Go to footer.php and paste the code before </body> and save it
For Blogger – Go to Edit Html and paste the code before </body> at the end of the template and save it.

add a header with opacity using jquery for blogger

Posted by tris tecno 0 komentar

When I was looking for my next blog post, I came around a website, which has an opacity header in fixed position. The next thing came in my mind was to come make that same feature happen in Blogger. So to make that happen I used opacity script developed by David Walsh and I modified the script to make it work on Blogger platform. This tutorial will let you to add a header with opacity using jQuery and you can its easily editable to add more options within this feature and before heading into the tutorial, take a backup of your template. So here we go.

Step 1: Login to your Blogger dashboard and navigate to Layout > Edit HTML. Now check the “Expand Widget Templates” and searc
<head>
<script src='http://sites.google.com/site/bloggermint/jquery-1.4.2.min.js' type='text/javascript'/>
<script type='text/javascript'>
$(document).ready(function() {
(function() {
//settings
var fadeSpeed = 200, fadeTo = 0.5, topDistance = 30;
var topbarME = function() { $(&#39;#opacitybar&#39;).fadeTo(fadeSpeed,1); }, topbarML = function() { $(&#39;#opacitybar&#39;).fadeTo(fadeSpeed,fadeTo); };
var inside = false;
//do
$(window).scroll(function() {
position = $(window).scrollTop();
if(position &gt; topDistance &amp;&amp; !inside) {
//add events
topbarML();
$(&#39;#opacitybar&#39;).bind(&#39;mouseenter&#39;,topbarME);
$(&#39;#opacitybar&#39;).bind(&#39;mouseleave&#39;,topbarML);
inside = true;
}
else if (position &lt; topDistance){
topbarME();
$(&#39;#opacitybar&#39;).unbind(&#39;mouseenter&#39;,topbarME);
$(&#39;#opacitybar&#39;).unbind(&#39;mouseleave&#39;,topbarML);
inside = false;
}
});
})();
});
</script>
h for the code <head> and replace it with the below code
 
In this step you can remove the jQuery script, if you have already initialized it on your blog.
Step 2: Now we are going to add the CSS code, which is responsible for appearing the opacity header on the top. So search for the code ]]></b:skin> and replace it with the below code

#opacitybar {
border-bottom:1px solid #ECF1EF;
background:#151715;
font-color:#000000;
padding:10px 20px;
position:fixed;
top:0;
left:0;
z-index:2000;
width:100%;
}
]]></b:skin>

Here you can change the color of the header bar by changing the background value.
Step 3: At this stage, we are heading to insert the functions to be visible on the header bar. So here I inserted basic navigation link to be seen inside the header bar, but this can be changed according to your own ideas. Search for the code <div id=’header-wrapper’> and replace the below code before <div id=’header-wrapper’>

<div id='opacitybar'>
<a href='#'>My Projects</a> |
<a href='#'>Freebies</a> |
<a href='#'>Tutorials</a> |

</div>

Save the template, to see the changes. If you have any troubles in making it work on Blogger platform, drop in your comments.

How To Add Facebook Comment Box To Blogger

Posted by tris tecno Minggu, 14 November 2010 0 komentar

Facebook comment box is one of the useful tool for bloggers to increase conversations. Recently Facebook has launched many social plugins for bloggers and web developers and one such is improved Facebook comment box. So here in this post I will teach you how to add/integrate Facebook comment box to blogger in simple steps. Before getting into the process I recommend you to back up your template and previous comments in blogger wont be visible if you use Facebook commenting system.


Step 1: Visit Facebook developer page and enter your blog name, URL and click on Create application.

Now copy the App ID and save it in a notepad

Step 2: Login to you Blogger dashboard and navigate to Layout > Edit HTML and check on Expand Widget Templates. Search for the code <data:post.body/> or <div class=’post-header-line-1′/> and paste the code below <data:post.body/> or <div class=’post-header-line-1′/> and save the template.

<b:if cond='data:blog.pageType == &quot;item&quot;'>
<p align='left'><img alt='' class='icon-action' src='https://blogger.googleusercontent.com/img/b/R29vZ2xl/AVvXsEhPa6mawqZMMfCOP-KHuqbC90KCQAjSpttmjxdfiY7pbWl4Mjc3K4GJYF6NpHuYq8p7Juit6CvDppxnP3oM7Cat32T4ie0Jrk5uBs3kX5JTRYQhVrlp92jKGObCYbaStfbrqFHnyhQC4odB/s1600/cmds.png'/></p>
<div id='fb-root'/>
<script>
window.fbAsyncInit = function() {
FB.init({appId: &#39;APPID&#39;, status: true, cookie: true,
xfbml: true});
};
(function() {
var e = document.createElement(&#39;script&#39;); e.async = true;
e.src = document.location.protocol +
&#39;//connect.facebook.net/en_US/all.js&#39;;
e.async = true;
document.getElementById(&#39;fb-root&#39;).appendChild(e);
}());
</script>
<fb:comments/>
</b:if>


Change the APPID on the code with your APP ID provided from Facebook and save the template.
Step 3: Now you need to hide default blogger commenting system. So navigate to Settings > Comments and select hide and save settings.

Live Demo
Note: Using Facebook Comments will hide your blogger comments. So use this comment box wisely.

How To Add Short URLs To Your Blogger Posts with Bit.ly

Posted by tris tecno Rabu, 10 November 2010 0 komentar

Having a Shorter Version of your Blog Post’s URL is much useful especially when sharing links with others. For example Take a look at this Link http://bit.ly/aJMJNI . If you visit that link, you will end up right back here. This URL shortening was done with the Help of the Bit.ly API. Bit.ly is one of the most reliable URL shortening services on the Web. Wordpress has got its own URL shortener namely WP.me. If you are interested in providing Short Sharable URLs of your Blogger Posts to your readers, then read on. Demo is present on the post page.

Template Tweaking to Add the  Short URLs

  1. Login to your Blogger Dashboard and navigate to Design > Edit HTML
  2. Click on the Check Box which says “Expand Widget Templates.
  3. Locate
    </head>
    and add the following JavaScript Snippet just above that
    <script charset='utf-8' src='http://bit.ly/javascript-api.js?version=latest&amp;login=tweettrackjs&amp;apiKey=R_7e9987b2fd13d7e4e881f9cbb168f523' type='text/javascript'/>
    <script src='http://blogger-plugins.googlecode.com/files/bloggerplugins.org.bit.ly.short.url.generator.js' type='text/javascript'/>
  4. Now Locate
    <p class='post-footer-line post-footer-line-3'>
    Or if that is not there then find
    <div class='post-footer-line post-footer-line-3'>
    Or if that is not there then find
    <data:post.body/>
    and place the  following code  just below any of these lines[whichever is present in your template].
    <div id='bp_shorturl'>
    <form expr:id='"bp_short_holder_" + data:post.id'/></div>
    <script type='text/javascript'>
    Bloggerplugins_shortener.init(&quot;bp_short_holder_<data:post.id/>&quot;,&quot;<data:post.url/>&quot;)
    </script>
Save the changes and now you should See a Sharable Short URL below each of your posts .If you want to tweak further, then read on.

Optional Tweaks

1.Styling the Share Link
Locate the following line in your template

]]></b:skin> 
and just above that line add

#bp_shorturl {

color:#666;

font-size:11px

}

#bp_shorturl input {

color:#999;

border:inset 1px #CDCDCD;

padding:1px 5px;

}
and save.

2. Display the Short Link on Post Pages Only
If you want to restrict the Short URLs to your post pages, then wrap the codes mentioned in Steps 1 and 4 within Conditional tags like :

<b:if cond='data:blog.pageType == &quot;item&quot;'>

<script charset='utf-8' src='http://bit.ly/javascript-api.js?version=latest&amp;login=tweettrackjs&amp;apiKey=R_7e9987b2fd13d7e4e881f9cbb168f523' type='text/javascript'/>

<script src='http://blogger-plugins.googlecode.com/files/bloggerplugins.org.bit.ly.short.url.generator.js' type='text/javascript'/>

</b:if>
and
<b:if cond='data:blog.pageType == &quot;item&quot;'>

<div id='bp_shorturl'>

<form expr:id='"bp_short_holder_" + data:post.id'/></div>

<script type='text/javascript'>

Bloggerplugins_shortener.init(&quot;bp_short_holder_<data:post.id/>&quot;,&quot;<data:post.url/>&quot;)

</script>

</b:if>
3. If you have your own Bit.Ly Login and API key, then you can replace them in the code of Step 1(tweettrackjs and R_7e9987b2fd13d7e4e881f9cbb168f523). Its free to signup and it is advised to use your own login and API because too many API calls on the same login can create an undefined error

10 Steps To Drive Traffic to Your Blog From LinkedIn

Posted by tris tecno Selasa, 09 November 2010 0 komentar
Whether you just created your first blog, or you are considered one of the top bloggers in the world like Darren Rowse, Chris Brogan, or Tim Ferriss, you are always looking for ways to generate more traffic to your site.  Even more so, you are looking for qualified traffic to your site, (i.e people who are interested in the content you produce).

LinkedIn is a great way to generate free, organic, traffic to your blog.
“But Lewis, isn’t LinkedIn just a site to post my resume when I am looking for a job?”
No, wake up people!  Although LinkedIn has been great for job seekers during the most recent economic cycle, it is much much more than that.  Individuals and companies are achieving more professional goals than imaginable on LinkedIn.  For example, LinkedIn can help you:
  • Sell products
  • Find new clients or employees
  • Generate leads
  • Receive funding for your company
  • Obtain sponsorships
  • Sell hundreds of tickets to your professional event
  • Get national and local press coverage
  • And last but not least, drive massive traffic to your blog
Achieving these goals on LinkedIn don’t come naturally.  You’ve gotta work the system on LinkedIn and experiment with different methods.  I’ve come up with the best ways to achieve those goals.  Here are my top 10 ways to drive traffic to your blog using LinkedIn:

1.  Complete Your Profile:

Numerous individuals have told me LinkedIn doesn’t work for them. I always ask them how much time they have put into using LinkedIn, their response – very little.  If your profile is weak people will lose interest quickly and may never click on your website links.
If you want people to read your profile and click on your websites then make your profile concise, compelling and value driven throughout.  Complete your profile 100%, add a great picture of yourself, and take the entire process very seriously.  The more complete and compelling your profile is, the more people will read and visit links you have posted.
This advice goes beyond driving traffic to your blog.  If someone were to Google your name (which most people do when they are researching you) your LinkedIn profile is one of the first things that pop up.  Personally, my LinkedIn profile is the third result, and for Darren Rowse it comes up seventh (before Facebook or Twitter).  Google your own name and check out what position your LinkedIn profile shows up.  You must make your profile compelling.

2.  Increase Your Connections:

The more connections you have, the more people will have access to your profile.  Every time you take an action on LinkedIn (i.e. update your profile, join a group, recommend someone, RSVP to an event, etc… this shows up on the home page of your 1st degree connections).  If you only have 100 connections, this limits the amount of potential clicks on your profile and website links per day. Constantly be updating and adding new connections.
add connections

3.  Customize Your Website Links:

When you first create your profile your website links will look like this:
blog links
However this is not a “call to action” and you are missing potential traffic because of it.  No one actually cares what your blog is unless it is relevant to them or solves a problem.  Instead, customize your website links to attract more clicks and drive more traffic to your blog.  If I were Darren, I would insert this:
LinkedIn blog
The second image is more compelling and explains exactly what the viewer will see on the next page when they click on each link.  In order to change your websites with a custom headline, click on the “edit” button next to one of the websites. View the image below for further details:
LinkedIn

4.  Answer Questions:

This is a great way to drive traffic to your blog.  The more questions you answer, the better the chances are of that person asking the question to click on your blog to learn more about you. Not only will that one person be more interested in learning more about you, but also others answering that question.  Additionally, when someone rates your answer as “The Best” of the mix, it will improve your thought  leadership status. It moves you up the rankings as a “featured expert” in the category you answered in.  When you are a featured expert people become more aware of your profile, and the chance they will click on your link to learn more about what you have to offer improves.

5.  Update Status:

For you Twitter lovers out there, this should be an easy step to take.  LinkedIn also has a status update feature that is a lot like Twitter, only it gives you 148 characters to work with instead of 140. Why is it so important to constantly update your status?  Because it is the first thing that pops up the home profile for all of your connections.  Check out your home page on LinkedIn and you will see a few status updates of those your are connected to.  If they are smart, they will include some compelling copy with a call to action and a link back to their blog (something I do that drives traffic to mine).
status update

6.  Join Niche Groups:

Whatever your blog is about, there is an audience of people on LinkedIn that share interest with.  To make it easy to find these people click on the “Group Search” tab and type in some key words that relate to your blog.  I have a sports industry blog that focuses mostly on social media with an audience of professionals who work in the sports.  I joined all of the professional sports groups I could find:
sports groups
Some of these niche groups have thousands of members who are actively involved in connect with other members.  If you are not in the groups where your audience for your blog is hanging out, then you are missing out on the opportunity for new readers, and organic traffic to your site.  Join as many groups as you can after doing a key word search that relates to your blog.
For starters – check out the Professional Bloggers Group.

7.  Post Comments In Groups:

Some larger groups are receiving hundreds of new discussion topics every few days (think of it as a forum).  People are sharing points of discussion, commenting and giving further feedback and suggestions on those comments.  Every time someone creates a new discussion topic, it shows up on the home profile of everyone in that group.  If there are 100,000 people in the group, then you are potentially getting the attention of 100,000 other individuals for your comment.
music group

8.  Add RSS Feed to Groups:

Each group has a section that allows you to add a link to a website with the latest news you think is relevant to that group.  It also allows you to add your own RSS feed or website link so it will automatically update the group every time you post a new article on your blog.  This creates an automated flow of organic traffic that will show up on the home profile of everyone connected in the group.  Again, this gives you more opportunities for people to view your blog.
LinkedIn

9.  Create a Group:

This may be one of the most powerful things you can do on LinkedIn.  I won’t go into all of the amazing details on how this has helped me, but I will tell you that owning a group drives a lot of traffic to your site. I own several niche related groups on LinkedIn.  For example, I created the Sports Industry Network group on LinkedIn and there are currently over 19,500 members.  When a new person joins the group, they see a brief description of the group, my name as the owner of the group, plus my website url www.sportsnetworker.com.  Since my group gets over 100 new members each week, that’s additional traffic from new members alone. That’s not even including the close to 20,000 members who are actively engaging in the group, and clicking on my blog links.

10.  Add the Blog Application to Your Profile:

This might be the most obvious suggestion, but I still see some of the top pro bloggers leaving this feature out.  This application posts the title and first paragraph for your most recent articles you have published on your LinkedIn profile.  It is a way to give viewers of your profile a sneak peak of what they will read on your blog.
Go to “applications” and download either the WordPress or Blog Link application and add your URL for your blog.
linkedin blog application
LinkedIn continues to be one of the top sites that drives traffic to my blog, thanks to these 10 examples, but the power of LinkedIn doesn’t stop here. What other tips have you found through using LinkedIn to increase traffic to your blog?

 This Article from : problogger.net

How To Remove The Navbar From Blogger ??

Posted by tris tecno Sabtu, 06 November 2010 0 komentar

If you've decided that you definitely want to remove your blogger navbar, it's actually a very simple process that any non-technically-inclined person can accomplish with ease. Just follow these steps:

1. Login to your blogger dashboard.
2. Click "Design"
3. Click "Edit HTML"

4. Find the BLUE code you see in the image to your right. The code will be quite near the top of your HTML section, you shouldn't have to scroll very far at all. The blue code should definitely be there, but the data box you see may not be, depending on where your template came from.
5. ADD the code you see in red precisely where you it see it in the image to your right. If you want to copy and paste it, do so from the bold text you see below:
#navbar-iframe {
display: none !important;
}
Preview It First!

Use your preview button before you click save! If you like what you see, go ahead and save.

What happens if I want the navbar back in the future?
Simply go back into your HTML the same way and delete the part you just added. It's really that simple!

How to Change the Favicon in Blogger ??

Posted by tris tecno 0 komentar

every blog in Blogger with the standard orange "B" blogger favicon. Having your own unique favicon is a great way to give your blogger template both a distinct and explicit brand. These small 16X16 pixel images will most definitely help your blog stand out from the rest of the blogspot blogs.

What is a Favicon?
A favicon is a small 16X16 image located at the top of your browser in the url bar.

How to Change your Favicon
  1. First go to Layout >Edit HTML in your Blogger Dashboard.
  2. Backup your existing template before making any changes!
  3. Place the code below directly below the </head> tag in your template.
  4. <link href='http://bsaves.com/HowHero/Blogger%20Templates/moonspot/images/favicon.ico' rel='shortcut icon' type='image/vnd.microsoft.icon' /> <link href='http://bsaves.com/HowHero/Blogger%20Templates/moonspot/images/favicon.ico' rel='icon'/>
  5. Now save your template.
  6. Once your template is saved view your blog and make sure to refresh the page and delete your cookies.
Creating your own Favicon
  1. Replace the image URL (2X) with your own 16 pixel by 16 pixel image hosted on the internet.
  2. http://bsaves.com/HowHero/Blogger%20Templates/moonspot/images/favicon.ico
  1. You can host your own favicon blogger image at sites such as ImageShack; PhotoBucket; Flickr; Fileden ; etc.
  2. Check out this Favicon Generator Tool which allows you to upload an image and it will format it for you!

Change the Title Tags in Blogger for More Search Engine Traffic

Posted by tris tecno 0 komentar
By default Blogger displays the blog title first, followed by the name of the post. As you might notice this is not good when it comes to SEO. It's important for the name of the post to come before the name of your blog, especially when it comes to google search results. Learn how to make your post title show up first so that you can reel in more traffic from the search engines.


Why Change the Titles?
It's quite important to have the Post Title + Blog Title arranged accordingly because this is how you would want your blog to be displayed on google's search results. This way more people will click on your link when searching google because the post title is more relevant than your post name.
Example Google Search Results:
You are most likely to click on the bottom image when searching google for the keywords "image reflection generator". The reason being is that your mind reads text from left to right. So it makes sense to have the more important title on the left.

How to Change the Titles:
  1. Go to Layout>edit HTML in your Blogger dashboard.
  2. Search for this tag: <title><data:blog.pageTitle/></title>
  3. Replace this tag with the following code:
  4. <b:if cond='data:blog.pageType == &quot;index&quot;'> <title><data:blog.title/></title> <b:else/> <title><data:blog.pageName/> | <data:blog.title/></title> </b:if>
  5. Save your template and you should see the results in your web browser as depicted in the images below.
  6. It may take a few days for the changes to show up on the google search results. I guarantee you that you will start receiving more traffic from google once you are re-indexed!


Add Facebook Buttons and Widgets To Your Blogger blog

Posted by tris tecno Kamis, 04 November 2010 0 komentar

Facebook has already overtaken Yahoo according to the stats from Alexa. So along with search engine optimization, you should also try to bring some traffic from social networking sites like Facebook.


Add these buttons to your blog and help your visitors to share your articles easily on FB.
Instructions to follow:
Log in to Blogger -> Layout -> Edit HTML, and select the tickbox "Edit Widget Templates"
Now find this code in your template:


<div class='post-header-line-1'/>

Now immediately below it, paste the code for the facebook button (select the appropriate one for your blog).
 ________________________________________________________________________________


As a link:
Add Facebook link to your blog
Code to paste:


<!--FB-BUTTON-STARTS--><b:if cond='data:blog.pageType == &quot;item&quot;'>
<span style="text-align: right;">
<a name="fb_share" type="icon_link" href="http://www.facebook.com/sharer.php">Share</a><script src="http://static.ak.fbcdn.net/connect.php/js/FB.Share" type="text/javascript"></script>
</span></b:if><!--FB-BUTTON-STOPS-->
Button #1
Add Facebook link to your blog
Code to paste:

<!--FB-BUTTON-STARTS--><b:if cond='data:blog.pageType == &quot;item&quot;'><span style="text-align: right;">
<a name="fb_share" type="button_count" href="http://www.facebook.com/sharer.php">Share</a><script src="http://static.ak.fbcdn.net/connect.php/js/FB.Share" type="text/javascript"></script>
</span></b:if><!--FB-BUTTON-STOPS-->

Button #2
Add Facebook link to your blog
Code to paste:

<!--FB-BUTTON-STARTS--><b:if cond='data:blog.pageType == &quot;item&quot;'><span style="text-align: right;">
<a name="fb_share" type="box_count" href="http://www.facebook.com/sharer.php">Share</a><script src="http://static.ak.fbcdn.net/connect.php/js/FB.Share" type="text/javascript"></script>
</span></b:if><!--FB-BUTTON-STOPS-->

______________________________________________________________________
Other Facebook Widgets you can display on your blog:
1. Facebook Profile Badge
2. Facebook Photo Badges
3. Live Stream Box (Just like the twitter widget):
Facebook Live Stream Box

4. And visit this page to add a Facebook Fan Box Widget to your blog.

Add related posts for your Blogger blog

Posted by tris tecno 0 komentar

The related articles are chosen from other posts in that same category/label/tag. With this hack many of your readers will remain on your site for longer periods of time when they see related posts of interest.


Steps for Implementation:


  • Go to Layout >Edit HTML in your Blogger Dashboard.


  • Back up your existing Template before making any changes!


  • Make sure to check the "Expand Widget Templates" box.


  • Search for the </head> tag.


  • Add the following code just before the </head> tag.


  • <style> #related-posts { float : left; width : 540px; margin-top:20px; margin-left : 5px; margin-bottom:20px; font : 11px Verdana; margin-bottom:10px; } #related-posts .widget { list-style-type : none; margin : 5px 0 5px 0; padding : 0; } #related-posts .widget h2, #related-posts h2 { font-size : 20px; font-weight : normal; margin : 5px 7px 0; padding : 0 0 5px; } #related-posts a { text-decoration : none; } #related-posts a:hover { text-decoration : none; } #related-posts ul { border : medium none; margin : 10px; padding : 0; } #related-posts ul li { display : block; background : url("https://blogger.googleusercontent.com/img/b/R29vZ2xl/AVvXsEiqKhin6H25csQjQQRdZiLLOV6fPvrr-30XTv4blUNV1dcvRhETWF41aYiZUgHmnM_UHnj_Nplx_vUXRKGKtYbyGYSQ9kz3us7gCdUC_j8rJ8AlmJWlqCwg2aL2K2_OtPU_e-ZtVM32rBk/") no-repeat 0 0; margin : 0; padding-top : 0; padding-right : 0; padding-bottom : 1px; padding-left : 21px; margin-bottom : 5px; line-height : 2em; border-bottom:1px dotted #cccccc; } </style> <script src='http://theblogtemplates.com/scripts/Related_posts_hack.js' type='text/javascript'/>


    • Now search for <data:post.body/>. In some of the templates this code may look like this
    <div class='post-body>
    or
    <data:post.body/>


    • Add the following code just beneath the code you just searched for.

    <b:if cond='data:blog.pageType == "item"'>
    <div id="related-posts">
    <font face='Arial' size='3'><b>Related Posts : </b></font><font color='#FFFFFF'><b:loop values='data:post.labels' var='label'><data:label.name/><b:if cond='data:label.isLast != &quot;true&quot;'>,</b:if><b:if cond='data:blog.pageType == &quot;item&quot;'>
    <script expr:src='&quot;/feeds/posts/default/-/&quot; + data:label.name + &quot;?alt=json-in-script&amp;callback=related_results_labels&amp;max-results=5&quot;' type='text/javascript'/></b:if></b:loop> </font>
    <script type='text/javascript'> removeRelatedDuplicates(); printRelatedLabels();
    </script>
    </div></b:if>
    • Now Save your Template and you're done!
    Customization
    • In order to change the number of maximum related posts being displayed for each label, search for the code below (within the code given in step 7) and change the number "5" to any desired number.
    max-results=5

    Make sitemap for blogger and submited to search engines

    Posted by tris tecno 0 komentar

    Sitemaps, in simple English, are text files (see example) containing a list of all web pages that exist on your site. It is important that you create a comprehensive sitemap as it will help Google and other search engines crawl your site better and that might mean more traffic coming your way in the long run.

    The Problem with Blogger Sitemap Files

    Ideally, the sitemap file should contain all URLs of a site but if your blog is hosted on blogspot.com (or if you are using a self-hosted version of Blogger with a custom domain), you’ll be surprised to know that the default sitemap file (see example) contains only the 26 most recent pages of your blog.

    That’s a bad thing because some of your older blog pages, that are missing from the system-generated sitemap file, may never get indexed in search engines. There’s however a simple solution to fix this problem.

    Generate a Complete Sitemap for your Blogger Blog

    Step 1: If you haven’t done this already, sign-in to your Google Webmasters account and add your blog. For details, check this video tutorial on how to add a blog to Google.
    Step 2: Once your blog is added to Google, open the Sitemap Generator and type the full address of your blogspot blog (or your self-hosted Blogger blog).

    Step 3: What you get is list of sitemap files that contain each and every page of your blog. You now just have to ping Google, Yahoo and Bing to inform them about these XML sitemaps.
    As shown in the video screencast below, you need to manually add each of the sitemap files into your Google Webmaster Tools dashboard but for Bing or Yahoo, you can simply click blue hyperlinks and these search engines will automatically download the relevant sitemap files from your blogspot site.


    Once all the Sitemaps are added, your Google Dashboard should look something like this.


    If you see a red cross or an orange exclamation symbol instead of the green tick, that means something is wrong with your XML sitemap. Verify that the file exists by typing the sitemap URL in your browser.
    Sometimes media enclosures (like MP3 files) in blog posts can create warnings during sitemap submission. And if you have switched from Blogger to WordPress, it still makes sense to submit sitemaps of your old Blogspot blog as that will only help search engines discover your new WordPress pages. Good luck.

    This article From : labnol.org

    How to Add a Guestbook to a Blogger Blog

    Posted by tris tecno Minggu, 31 Oktober 2010 0 komentar

    Guest-book is something like blogger comments which gives website visitor and owner a chance to communicate with each other.This article will show you how to add guest book to blogger blog.


    Steps

    1. Select the Guest book Service that you want to add to blogger(you can find some in blogger widgets or google for it)

    2. Follow the instructions to set up Guest book service account and copy html code
    3. Sign into your blogger blog and under Design-page element-add a widget,select html/javascript into pop-up window paste your guest book code and save it

    4. Now your guestbook will appear in sidebar.(you can also insert it in edit html mode)

    Tips
    Fix the width as per your sidebar
    Preview your changes before to save them


    Warnings

    .If you are not familiar with HTML then don't make any change to your template as it may spoil your blog design.

    Things You'll Need

    * Guest book service account
    * Guest book HTML code
    * Blogger Blog
    Ping your blog, website, or RSS feed for Free