Tampilkan postingan dengan label blogger widget. Tampilkan semua postingan

Recent Posts Widget with Thumbnails

Posted by tris tecno Rabu, 14 Desember 2011 0 komentar
At least some of you would be familiar with My "Recent Posts with Thumbnails" Gadget for Blogger. I had got so many complaints that the Gadget fails to load or has some issues. So I decided to make a Widget version of the same.


Why the other Gadget fails at times?

The other gadget is made using the Gadget API. The API renders the gadget as an iFrame with all the parameters appended to the iFrame URL. When the iFrame url becomes too big, browsers have issues rendering the gadget. This primary reason behind this is that the API appends so many style parameters to the iFrame URL thereby making it pretty lengthy.The current page url is also a parameter.That is why some people complain that it is working on the home page, whereas it doesn't work on some of the post pages. The reason is that your home page url is shorter in length than your post page url. So it is almost impossible to make the gadget error free.

So What now?

This new Widget doesn’t rely on the Gadget API, and is not loaded as an iFrame. This is a plain JavaScript widget, and will work across all browsers.

What’s special about this new Widget?

If you are good at CSS, you can make the widget exactly as you want. There is no limit in customizing this Widget. This doesn’t mean that it is useful only to those who are familiar with CSS. The Widget by default will inherit your Blog’s Styling. So it should look pretty neat with the default Styling

Options in the Widget Installer

  1. Blog URL: This should be the URL of a blogger Blog. If you are installing the Widget on the same blog then you can leave this field blank . This field is useful for those who have multiple blogs..
  2. Number of Posts – The number of posts displayed in the Widget
  3. Maximum title Length – This option can be used to chop off really long Post Titles. If a post title is longer than this length, the widget will chop off the rest of the title
  4. Show Thumbnail – It’s pretty much obvious from the name
  5. Show Default Thumbnail – If this option is selected, and your post doesn’t have an image, then a default image will be displayed.
  6. Thumbnail Dimension – The gadget can generate square thumbnails of any size. Use this option to set the dimension of the thumbnail.
  7. Float Thumbnail to – This option can be used to align the image thumbnail to the left or to the right
  8. Thumbnail Margin – You can set a 5px margin to the image, so that the thumbnail stays apart from the post summary. You can override the margin by selecting No.(You can then manually style it using CSS)
  9. Show summary
  10. Summary size – If summary is more than this length, then the widget will chop off the rest
  11. Show post date
  12. Show Comment Number
  13. Show Read more Link
  14. Read More Text – This is the Text Shown on the Read More Link
  15. Use Full Feed – By default the Widget will use the Blogger Summary feed which is smaller in size. If you select the Full Feed option, it will use the Full Feed which is bigger in size, and hence the Widget would get slower. The advantage is that, you would get thumbnails of YouTube videos that you have posted.
  16. Sorting – Helps you in displaying the recently published posts or recently updated posts.
Now that you are clear with the options, use the below button to add the Widget to your Blog.
Add Recent Posts Widget

Advanced Options:

1. Default Thumbnail
If the Widget is unable to find an image in the Post and if Options 4 and 5 are checked, then the Gadget will use the following image by default

If you want to change this default thumbnail, then you will have to first upload the Thumbnail somewhere. The best place to upload is blogger. So create a new post(or edit an existing one) and add the image to the post. Now Switch to the Edit HTML view of the Post Editor. There you will find a URL which contains “/s1600/” in it. Copy that URL. Change /s1600/ to /s72-c/. So finally you will get some URL like
https://blogger.googleusercontent.com/img/b/R29vZ2xl/AVvXsEiFv_UaqdxzG60woQocMhs91SS_iKjVEfAdHyHCqOZpY0brFb4B-6MEB5jTy7jiq48-Uo2iOzAX_BFTOi1Itj6TCwBhmrqpGP6hvUqazlQ_zEaVcqiUZP54P2Bvp0dLvbjCYP6SyOvknn4/s72-c/default.png
This is your default Thumbnail's URL. Now it’s time to tell the script to make use of this Image. For that Edit the HTML/JavaScript Widget(Recent Posts) and add the following variable:
var defaultImage=”THUMBNAIL_URL_WHICH_HAS_/s72-c/_IN_IT”;
(Off course you will have to edit the above line)
If you are not sure where to add the variable, then add it just before
var numberOfPosts
Save the Gadget and you are done.
2. CSS Styling:
If you are using CSS Styling, make sure that the Thumbnail Margin is set to None. You can also set the Thumbnail Float to None. This will prevent the Widget JavaScript from adding any Styles to the Post List.
You can add your CSS at Template Designer > Advanced > Add CSS
Some Sample CSS snippets are there in the comments.
3. Tracking the Widget Usage
I have appended a utm_src parameter to the recent post URLs.This will help you in tracking the widget usage from your Google Analytics account(Traffic Sources > Campaigns).
4. Remove the Powered By Link
If you can’t stand the powered by Link at the bottom of the widget, then you can hide it. To do that Add this CSS snippet :( :(

.bp_footer{display:none;}

If you don’t know how to add CSS read the CSS Styling (2) part in these Advanced Options.

Hmmm at the moment, I’m a little lazy to create a Demo Blog. You can expect that sometime soon.

If you have any doubts or questions or suggestions, feel free to comment here and I will try my best to reply to each of your comments.

I know that many bloggers are having issues in using the old Gadget. So kindly help others by sharing this new post :)

Related Posts Widget for Blogger with Thumbnails

Posted by tris tecno 0 komentar
Displaying the links to related posts along with a thumbnail of the corresponding post will help you increase the page views/user .Users will be tempted to go for the related posts when they are presented attractively with thumbnails.


This is another first release from me.This one also uses the media thumbnails generated by blogger for each post.

For displaying the thumbnails,this widget will use the images uploaded for the post using the blogger image uploader(from the post editor) [Update - Now supports external images also.]
Related Posts Widget with Thumbnails for Blogger

Here are the detailed steps to install the related posts widget for blogger with thumbnails

1.First of all Login to your blogger dashboard and navigate to Layout > Edit HTML and check the "Expand Widget Templates" check box

2.Now look for

</head>

and replace it with

<!--Related Posts with thumbnails Scripts and Styles Start-->
<!-- remove --><b:if cond='data:blog.pageType == &quot;item&quot;'>
<style type="text/css">
#related-posts {
float:center;
text-transform:none;
height:100%;
min-height:100%;
padding-top:5px;
padding-left:5px;
}

#related-posts h2{
font-size: 1.6em;
font-weight: bold;
color: black;
font-family: Georgia, &#8220;Times New Roman&#8221;, Times, serif;
margin-bottom: 0.75em;
margin-top: 0em;
padding-top: 0em;
}
#related-posts a{
color:black;
}
#related-posts a:hover{
color:black;
}

#related-posts a:hover {
background-color:#d4eaf2;
}
</style>
<script type='text/javascript'>
var defaultnoimage="https://blogger.googleusercontent.com/img/b/R29vZ2xl/AVvXsEjHesfHSrSjXWLuZ9cd2p0tLDYcmiF8A7Zl_TM_unWvnsj0CTfcfz1mnMjZanjCaEMf1-Unxa38ObnCBXrqmcvpBs7AagCSknC34dlErQBAn4V_F2aooeBYWngJTjP-gnen7Si98F3CgVw/s400/noimage.png";
var maxresults=5;
var splittercolor="#d4eaf2";
var relatedpoststitle="Related Posts";
</script>
<script src='http://blogergadgets.googlecode.com/files/related-posts-with-thumbnails-for-blogger-pro.js' type='text/javascript'/>
<!-- remove --></b:if>
<!--Related Posts with thumbnails Scripts and Styles End-->
</head>

3.Now Find

<div class='post-footer-line post-footer-line-1'>

If you cant find it then try finding this one

<p class='post-footer-line post-footer-line-1'>

Now immediately after any of these lines(whichever you could find) place this code snippet

<!-- Related Posts with Thumbnails Code Start-->
<!-- remove --><b:if cond='data:blog.pageType == &quot;item&quot;'>
<div id='related-posts'>
<b:loop values='data:post.labels' var='label'>
<b:if cond='data:label.isLast != &quot;true&quot;'>
</b:if>
<script expr:src='&quot;/feeds/posts/default/-/&quot; + data:label.name + &quot;?alt=json-in-script&amp;callback=related_results_labels_thumbs&amp;max-results=6&quot;' type='text/javascript'/></b:loop>
<script type='text/javascript'>
removeRelatedDuplicates_thumbs();
printRelatedLabels_thumbs(&quot;<data:post.url/>&quot;);
</script>
</div><div style='clear:both'/>
<!-- remove --></b:if>
<b:if cond='data:blog.url == data:blog.homepageUrl'><b:if cond='data:post.isFirstPost'>
<a href='http://www.bloggerplugins.org/2009/08/related-posts-thumbnails-blogger-widget.html'><img style="border: 0" alt="Related Posts Widget For Blogger with Thumbnails" src="http://image.bloggerplugins.org/blogger-widgets.png" /></a><a href='http://bloggertemplates.bloggerplugins.org/' ><img style="border: 0" alt="Blogger Templates" src="http://image.bloggerplugins.org/blogger-templates.png" /></a>
</b:if></b:if>
<!-- Related Posts with Thumbnails Code End-->

4.You can adjust the maximum number of related posts being displayed by editing this line in the code.

var maxresults=5;

5.To edit the title of the widget you can change this line of code

var relatedpoststitle="Related Posts";

6.To change the default thumbnail, you can edit this line of code

var defaultnoimage="https://blogger.googleusercontent.com/img/b/R29vZ2xl/AVvXsEjHesfHSrSjXWLuZ9cd2p0tLDYcmiF8A7Zl_TM_unWvnsj0CTfcfz1mnMjZanjCaEMf1-Unxa38ObnCBXrqmcvpBs7AagCSknC34dlErQBAn4V_F2aooeBYWngJTjP-gnen7Si98F3CgVw/s400/noimage.png";

7.To Change the Colour of the Splitter Line , edit

var splittercolor="#d4eaf2";

To change the other colours and all you will have to modify the CSS

If you fall into troubles implementing this,don't panic.. :) .just leave me a comment here and i will help you out. If you like to give me any suggestions on how to improve this widget,then it would be really great.
How to display the related posts on every page and not only on the post pages?

Just remove the two lines starting with from both step 3 and step 2.

that is lines

<!-- remove --><b:if cond='data:blog.pageType == &quot;item&quot;'>

and

<!-- remove --></b:if>

Adding Facebook Like Button To Blog Posts (For Blogger)

Posted by tris tecno 0 komentar
Facebook like button is probably the most important facebook integration to socialize your blog. It allows your blog content to be shared with the click of a button without leaving the page. I recently wrote a post on creating a facebook fan page and adding a like box to your blog and I suggest you check it out if you haven’t. Adding facebook like button involves just a couple of steps easy to implement.
You can add a like button for your fan page or a like button for each and every blog post. There’s an old post I made on adding facebook like button to blog posts but this one explains it even further.

ADDING LIKE BUTTON TO EACH BLOG POST

This makes it a lot easier for your readers to share your blog posts with just a click. To add facebook like button to every blog posts automatically, follow the steps below:

1. Login to your blogger account and select Design

2. Click on Edit HTML

3. Check the box labelled Expand Widget Template

4. Like I always emphasize, back up your template before making changes in case something goes wrong

5. Press CTRL + F and search for <data:post.body/>

If you’re using a magazine style template or used the automatic read more hack I posted, you might find two or more <data:post.body/> in your template. You should try both to know which one works. The second works on my template though.

6. If you prefer to have the facebook like button to appear on top of your blog post right below the title, paste this code above <data:post.body/>

<b:if cond='data:blog.pageType == &quot;item&quot;'><div><iframe allowTransparency='true' expr:src='&quot;http://www.facebook.com/plugins/like.php?href=&quot; + data:post.url + &quot;&amp;layout=standard&amp;show_faces=false&amp;width=100&amp;action=like&amp;font=arial&amp;colorscheme=light&quot;' frameborder='0' scrolling='no' style='border:none; overflow:hidden; width:400px; height:27px;'/></div></b:if> <br/>

7. If you prefer to see the like button below your blog posts, paste this code below <data:post.body>

8. You might as well put it in both positions. Save your template and view the change on your blog.

Note:
You can change the layout written in red which is set to standard by default to button_count if you want the like button to show number of likes instead.

You can as well set show_faces which is false by default to true. This enables the like button to show photos underneath but it applies to the standard button only.

The code above too only shows the like button on post pages. It won’t appear on static pages like label search results and home page. To make the like button appear on static pages involves removing two lines of codes: <b:if cond=’data:blog.pageType == &quot;item&quot;’> and </b:if>.
With those removed, the facebook like button appears on static pages and on blog post pages as well.

Add Tweet Box to Blogger

Posted by tris tecno Rabu, 17 November 2010 0 komentar

It has been a long time since @Twitter released the @AnyWhere Developer Tool. AnyWhere allows you to seamlessly integrate Twitter into your site using a few lines of JavaScript. You can read more about it at  @AnyWhere Developer Page. Tweet Box is one such @AnyWhere Application, which allows you to add a 140 char Tweet Box onto your blog.

Here is a screen shot of how the Tweet box appear on my Previous Post.

Hope that now you got a good idea of how this works, If not scroll down to the bottom of the post and see it in live action :)

How to add the Tweet Box on a Blogger Blog?

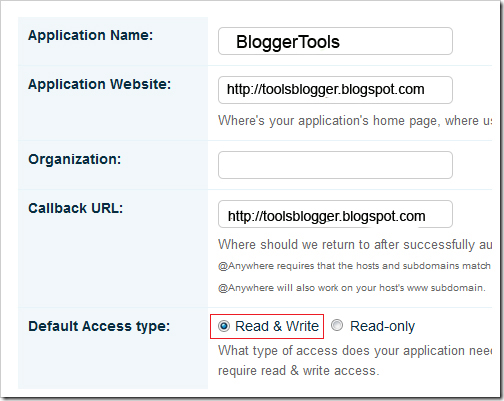
1. Go to the @AnyWhere Developers Page and create an Application there with your blog details.

Make Sure that you have checked the Read & Write Option when you Register your Application

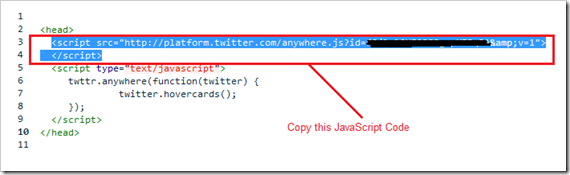
2.When you complete the signup process, you will get some JavaScript codes, with a unique API Key

Copy out the JavaScript from there(the code in the red box) as shown in this Screenshot.

3.Now Login to your Blogger Dashboard and navigate to the Edit HTML Tab under Design and “Expand your Widget Templates
4.Look for

</head>
and paste the copied Twitter JavaScript just above that line and save the template. 
5.Now look for 

<data:post.body/>
and immediately below that paste the following JavaScript Code and save your template. (Editable parts are shown in red) 


<b:if cond='data:blog.pageType == &quot;item&quot;'>

<div id='bp_tweetBox'/>

<script type='text/javascript'>

bp_tweet_link=&quot;<data:post.url/>&quot;;

twttr.anywhere(function (T) {

T(&quot;#bp_tweetBox&quot;).tweetBox({

width: 560,

label: &quot;Share the L&#10084;ve  &amp; Retweet&quot;,

defaultContent: &quot;RT @bloggerplugins <data:post.title/>&quot;+&quot; &quot;+bp_tweet_link

});

});

</script>

</b:if>
Now you should see the Tweet Box on all of your post pages
Currently, this doesn’t do any URL shortening . You can expect that
it my next post. I will  also try to post about the other @AnyWhere
features soon :)

Best Social Bookmarking Widget For Blogger

Posted by tris tecno Senin, 15 November 2010 0 komentar

Blogging without social bookmarking is pretty hard to gain quality traffic and here I am going to teach you how to add a beautiful social bookmarking widget for blogger/blogspot blogs. This widget comes with essential bookmarking icons such as Tweetmeme button, Google Buzz, Facebook share, Digg and lots more. You also can add some more social bookmarking button to your needs. So lets get into the installation part on your blogger blogs. Before you could start the process, back your template.

Step 1: Login in to your Blogger dashboard and navigate to Layout > Edit HTML and check on Expand Widget Templates.Search for the code  ]]></b:skin> and replace it with the below code

#share{
/* The share box container */
float:left;
width:500px;
background:#231f20;
height:220px;
margin:60px auto;
overflow:hidden;

-moz-border-radius:12px;
-webkit-border-radius:12px;
border-radius:12px;
}

#share-label{
/* The image on the right */
background:url(http://i41.tinypic.com/90352u.jpg) no-repeat 50% 50%;
float:left;
height:220px;
width:200px;
}

#sharebox{
/* This is where the animation takes place */
position:relative;

border-right:1px solid #DDDDDD;
width:290px;
height:220px;
background:#747474;
float:left;

border-bottom-left-radius:12px;
border-top-left-radius:12px;

-moz-border-radius-bottomleft:12px;
-moz-border-radius-topleft:12px;

-webkit-border-bottom-left-radius:12px;
-webkit-border-top-left-radius:12px;
}

.btn{
/* This class is assigned to every share button */
background-color:#747474;
height:90px;
left:0;
top:0;
width:60px;
position:relative;
margin:20px 0 0 10px;
float:left;
}

.bcontent{
/* Positioned inside the .btn container */
position:absolute;
top:auto;
bottom:20px;
left:0;
}

.thanksto{
position:absolute;
bottom:2px;
right:4px;
font-size:10px;
}

.thanksto a,.thanksto a:visited{
color:#BBB;
}

/* Customizing the facebook share button */

span.fb_share_no_count {
display:block;
}

span.fb_share_count_top.fb_share_no_count {
line-height:54px;
}

span.fb_share_count_nub_top.fb_share_no_count{
display:none;
}

span.fb_share_no_count span.fb_share_count_inner {
background:#3B5998 url(http://static.fbshare.me/f_only.png) no-repeat scroll 20px 5px;
display:block;
}
]]>

Step 2: Now at this step we will adding the share button within the CSS style. Search for the code and replace it with the below code


 Step 3: Save your template and check for changes. If you find any issues with installation, drop in your comments.

add a header with opacity using jquery for blogger

Posted by tris tecno 0 komentar

When I was looking for my next blog post, I came around a website, which has an opacity header in fixed position. The next thing came in my mind was to come make that same feature happen in Blogger. So to make that happen I used opacity script developed by David Walsh and I modified the script to make it work on Blogger platform. This tutorial will let you to add a header with opacity using jQuery and you can its easily editable to add more options within this feature and before heading into the tutorial, take a backup of your template. So here we go.

Step 1: Login to your Blogger dashboard and navigate to Layout > Edit HTML. Now check the “Expand Widget Templates” and searc
<head>
<script src='http://sites.google.com/site/bloggermint/jquery-1.4.2.min.js' type='text/javascript'/>
<script type='text/javascript'>
$(document).ready(function() {
(function() {
//settings
var fadeSpeed = 200, fadeTo = 0.5, topDistance = 30;
var topbarME = function() { $(&#39;#opacitybar&#39;).fadeTo(fadeSpeed,1); }, topbarML = function() { $(&#39;#opacitybar&#39;).fadeTo(fadeSpeed,fadeTo); };
var inside = false;
//do
$(window).scroll(function() {
position = $(window).scrollTop();
if(position &gt; topDistance &amp;&amp; !inside) {
//add events
topbarML();
$(&#39;#opacitybar&#39;).bind(&#39;mouseenter&#39;,topbarME);
$(&#39;#opacitybar&#39;).bind(&#39;mouseleave&#39;,topbarML);
inside = true;
}
else if (position &lt; topDistance){
topbarME();
$(&#39;#opacitybar&#39;).unbind(&#39;mouseenter&#39;,topbarME);
$(&#39;#opacitybar&#39;).unbind(&#39;mouseleave&#39;,topbarML);
inside = false;
}
});
})();
});
</script>
h for the code <head> and replace it with the below code
 
In this step you can remove the jQuery script, if you have already initialized it on your blog.
Step 2: Now we are going to add the CSS code, which is responsible for appearing the opacity header on the top. So search for the code ]]></b:skin> and replace it with the below code

#opacitybar {
border-bottom:1px solid #ECF1EF;
background:#151715;
font-color:#000000;
padding:10px 20px;
position:fixed;
top:0;
left:0;
z-index:2000;
width:100%;
}
]]></b:skin>

Here you can change the color of the header bar by changing the background value.
Step 3: At this stage, we are heading to insert the functions to be visible on the header bar. So here I inserted basic navigation link to be seen inside the header bar, but this can be changed according to your own ideas. Search for the code <div id=’header-wrapper’> and replace the below code before <div id=’header-wrapper’>

<div id='opacitybar'>
<a href='#'>My Projects</a> |
<a href='#'>Freebies</a> |
<a href='#'>Tutorials</a> |

</div>

Save the template, to see the changes. If you have any troubles in making it work on Blogger platform, drop in your comments.

How To Add Facebook Comment Box To Blogger

Posted by tris tecno Minggu, 14 November 2010 0 komentar

Facebook comment box is one of the useful tool for bloggers to increase conversations. Recently Facebook has launched many social plugins for bloggers and web developers and one such is improved Facebook comment box. So here in this post I will teach you how to add/integrate Facebook comment box to blogger in simple steps. Before getting into the process I recommend you to back up your template and previous comments in blogger wont be visible if you use Facebook commenting system.


Step 1: Visit Facebook developer page and enter your blog name, URL and click on Create application.

Now copy the App ID and save it in a notepad

Step 2: Login to you Blogger dashboard and navigate to Layout > Edit HTML and check on Expand Widget Templates. Search for the code <data:post.body/> or <div class=’post-header-line-1′/> and paste the code below <data:post.body/> or <div class=’post-header-line-1′/> and save the template.

<b:if cond='data:blog.pageType == &quot;item&quot;'>
<p align='left'><img alt='' class='icon-action' src='https://blogger.googleusercontent.com/img/b/R29vZ2xl/AVvXsEhPa6mawqZMMfCOP-KHuqbC90KCQAjSpttmjxdfiY7pbWl4Mjc3K4GJYF6NpHuYq8p7Juit6CvDppxnP3oM7Cat32T4ie0Jrk5uBs3kX5JTRYQhVrlp92jKGObCYbaStfbrqFHnyhQC4odB/s1600/cmds.png'/></p>
<div id='fb-root'/>
<script>
window.fbAsyncInit = function() {
FB.init({appId: &#39;APPID&#39;, status: true, cookie: true,
xfbml: true});
};
(function() {
var e = document.createElement(&#39;script&#39;); e.async = true;
e.src = document.location.protocol +
&#39;//connect.facebook.net/en_US/all.js&#39;;
e.async = true;
document.getElementById(&#39;fb-root&#39;).appendChild(e);
}());
</script>
<fb:comments/>
</b:if>


Change the APPID on the code with your APP ID provided from Facebook and save the template.
Step 3: Now you need to hide default blogger commenting system. So navigate to Settings > Comments and select hide and save settings.

Live Demo
Note: Using Facebook Comments will hide your blogger comments. So use this comment box wisely.

How To Add Short URLs To Your Blogger Posts with Bit.ly

Posted by tris tecno Rabu, 10 November 2010 0 komentar

Having a Shorter Version of your Blog Post’s URL is much useful especially when sharing links with others. For example Take a look at this Link http://bit.ly/aJMJNI . If you visit that link, you will end up right back here. This URL shortening was done with the Help of the Bit.ly API. Bit.ly is one of the most reliable URL shortening services on the Web. Wordpress has got its own URL shortener namely WP.me. If you are interested in providing Short Sharable URLs of your Blogger Posts to your readers, then read on. Demo is present on the post page.

Template Tweaking to Add the  Short URLs

  1. Login to your Blogger Dashboard and navigate to Design > Edit HTML
  2. Click on the Check Box which says “Expand Widget Templates.
  3. Locate
    </head>
    and add the following JavaScript Snippet just above that
    <script charset='utf-8' src='http://bit.ly/javascript-api.js?version=latest&amp;login=tweettrackjs&amp;apiKey=R_7e9987b2fd13d7e4e881f9cbb168f523' type='text/javascript'/>
    <script src='http://blogger-plugins.googlecode.com/files/bloggerplugins.org.bit.ly.short.url.generator.js' type='text/javascript'/>
  4. Now Locate
    <p class='post-footer-line post-footer-line-3'>
    Or if that is not there then find
    <div class='post-footer-line post-footer-line-3'>
    Or if that is not there then find
    <data:post.body/>
    and place the  following code  just below any of these lines[whichever is present in your template].
    <div id='bp_shorturl'>
    <form expr:id='"bp_short_holder_" + data:post.id'/></div>
    <script type='text/javascript'>
    Bloggerplugins_shortener.init(&quot;bp_short_holder_<data:post.id/>&quot;,&quot;<data:post.url/>&quot;)
    </script>
Save the changes and now you should See a Sharable Short URL below each of your posts .If you want to tweak further, then read on.

Optional Tweaks

1.Styling the Share Link
Locate the following line in your template

]]></b:skin> 
and just above that line add

#bp_shorturl {

color:#666;

font-size:11px

}

#bp_shorturl input {

color:#999;

border:inset 1px #CDCDCD;

padding:1px 5px;

}
and save.

2. Display the Short Link on Post Pages Only
If you want to restrict the Short URLs to your post pages, then wrap the codes mentioned in Steps 1 and 4 within Conditional tags like :

<b:if cond='data:blog.pageType == &quot;item&quot;'>

<script charset='utf-8' src='http://bit.ly/javascript-api.js?version=latest&amp;login=tweettrackjs&amp;apiKey=R_7e9987b2fd13d7e4e881f9cbb168f523' type='text/javascript'/>

<script src='http://blogger-plugins.googlecode.com/files/bloggerplugins.org.bit.ly.short.url.generator.js' type='text/javascript'/>

</b:if>
and
<b:if cond='data:blog.pageType == &quot;item&quot;'>

<div id='bp_shorturl'>

<form expr:id='"bp_short_holder_" + data:post.id'/></div>

<script type='text/javascript'>

Bloggerplugins_shortener.init(&quot;bp_short_holder_<data:post.id/>&quot;,&quot;<data:post.url/>&quot;)

</script>

</b:if>
3. If you have your own Bit.Ly Login and API key, then you can replace them in the code of Step 1(tweettrackjs and R_7e9987b2fd13d7e4e881f9cbb168f523). Its free to signup and it is advised to use your own login and API because too many API calls on the same login can create an undefined error

Add Facebook Like Box For Blogger

Posted by tris tecno 0 komentar
https://blogger.googleusercontent.com/img/b/R29vZ2xl/AVvXsEg1H5P0Ixki1LSJVJXBAghyjQwFYoxC0LMumP83k-R4T7H_uK8x6VW1kGI8XLFutoR8LO7wVtaivPclIxDh3wy-7FGX4Xl_rBNL17Qwv0fnwtj3AC6vbt1A3XlhXBKECVq03HtUh_mlpr4/


Facebook Like Button allows you to provide more Sharing Options to your Readers. Your readers can share your posts on Facebook using the Like Button. Have you added the Like button and still not getting any “Likes”? :(. Ok then we will present the Like button in a much better and elegant way.


Here is a Screenshot of the Facebook Like Box. Isn’t it lovely and more “Likable” than the default Like Button?
  
The  Facebook Like box also includes a link to  your Facebook Fan Page. This FB Like Box was Designed Styled and coded by Mia of Dezign Matterz .  Thanks to her for designing and styling  this awesome Like Box.

How to install the Facebook Like Box?

1. First Fill in the following Details (Code will be updated with these details)
Width of the Like Box                     (Enter the appropriate width of the FB like box) Facebook Fan Page / Profile URL
2. Now Login to your Blogger Account and navigate to Design > Edit HTML and check the option which says “Expand Widget Templates” 3. Look for  ]]></b:skin> in your template and just above that place the following code (You can use Ctrl +F to find the code).
.fb_like_box {
margin-top:10px;
-moz-border-radius:10px 10px 10px 10px;
border-radius:10px;
background-color:#3B5999;
border:3px solid #2B2B2B;
margin-bottom:10px;
padding:10px 7px;
width:540px;
}
.fb_like_top {
overflow:visible;
padding:0;margin:0 0 5px;
width:349px;
height:24px;
background:url("https://blogger.googleusercontent.com/img/b/R29vZ2xl/AVvXsEhwyRG2POhQcGSm58cTqXj5RP6bEo4Pg9nLBZ2ZmLkAPWkoRISu_TrGqj_eRgmuYkdEOFR1JWDw-RFCB_vTzN7LS136ITvTgqPJdY3OC5QOpZg-8uJD2-rAEfsiwksv5_nhjZLuF_WiVhc/") no-repeat scroll left top transparent;
}
.fb_like_button_holder {
-moz-border-radius:10px 10px 10px 10px;
border-radius:10px;
background:none repeat scroll 0 0 #FFFFFF;
padding:12px 12px 0 12px;
width:515px;
height:42px;
}
4. Now Look for <data:post.body/> in your template and just below that add the following code. 
<b:if cond='data:blog.pageType == &quot;item&quot;'>
<div class='fb_like_box'>
<div class='fb_like_top'></div>
<div class='fb_like_button_holder'>
<iframe allowTransparency='true' expr:src='&quot;http://www.facebook.com/plugins/like.php?href=&quot; + data:post.url + &quot;&amp;layout=standard&amp;show_faces=false&amp;width=100&amp;action=like&amp;font=arial&amp;colorscheme=light&quot;' frameborder='0' scrolling='no' style='border:none; overflow:hidden; width:450px;height:30px;'/>
</div>
</div>
</b:if>
  5. Now Save your template and you will see a Facebook Like Box on your post pages.

How To Remove The Navbar From Blogger ??

Posted by tris tecno Sabtu, 06 November 2010 0 komentar

If you've decided that you definitely want to remove your blogger navbar, it's actually a very simple process that any non-technically-inclined person can accomplish with ease. Just follow these steps:

1. Login to your blogger dashboard.
2. Click "Design"
3. Click "Edit HTML"

4. Find the BLUE code you see in the image to your right. The code will be quite near the top of your HTML section, you shouldn't have to scroll very far at all. The blue code should definitely be there, but the data box you see may not be, depending on where your template came from.
5. ADD the code you see in red precisely where you it see it in the image to your right. If you want to copy and paste it, do so from the bold text you see below:
#navbar-iframe {
display: none !important;
}
Preview It First!

Use your preview button before you click save! If you like what you see, go ahead and save.

What happens if I want the navbar back in the future?
Simply go back into your HTML the same way and delete the part you just added. It's really that simple!

google buzz share button with counter for blogger

Posted by tris tecno 0 komentar

Google Buzz is a great social tool which is very similiar to Twitter and Facebook. It's a wonderful way to engage and interact with your readers! Make sure to implement these Google Buzz buttons into your blogger posts, so that users can easily share your content on Google Buzz.

Add Google Buzz it Button to Blogger

  1. Go to Layout >Edit HTML in your Blogger Dashboard.
  2. Back up your existing Template before making any changes!
  3. Make sure to check the "Expand Widget Templates" box.
  4. Here is the Google Buzz it Code:
<div style="float:right;padding:4px;">
<a expr:href='&quot;http://www.google.com/reader/link?url=&quot; + data:post.url + &quot;&amp;title=&quot; + data:post.title + &quot;&amp;srcTitle=&quot; + data:blog.title+ &quot;&amp;srcURL=&quot; + data:blog.homepageUrl ' rel='nofolloW' style='text-decoration:none;' target='_blank'>
<img alt='Buzz It' src='http://i48.tinypic.com/idyc04.png' style='border:0px;'/></a>
</div>
5.Search for this line of code in your template:
<div class='post-header-line-1'/>

and place the Google Buzz it Code right after the code you searched for above.
If this doesn't work, then search for this code below and place the Google Buzz it Code directly before it

<data:post.body/>

6.Now save your template and you're done!

Add Google Buzz Button with Share Count to Blogger

  1. Here is the Google Buzz it with Share Count Code
    <div style="float:right;padding:4px;"> <script type='text/javascript'> njuice_buzz_url = '<data:post.title/>'; njuice_buzz_title = '<data:post.url/>'; njuice_buzz_share = 'reader'; </script> <script type='text/javascript' src='http://button.njuice.com/buzz.js'/> </div>
  2. Place the Google Buzz it with Share Count Code either
    directly after this:
    <div class='post-header-line-1'/>
    OR
    directly before this:
    <data:post.body/>
  3. To change the style of the widget add either
    njuice_buzz_size = 'small';
    or
    njuice_buzz_size = 'simple';
    just after
    njuice_buzz_share = 'reader';
  4. Save your blogger template and you're done!

Post views/ Page views counter for Blogger

Posted by tris tecno Jumat, 05 November 2010 0 komentar

I’m sure that every blogger wants to know how many times his new post viewed.
A lot of Bloggers need this widget and asked if it’s possible to do it in blogger?.

So today i’ll show you how to do it in blogger,
It’s very easy to do and there are 2 styles for this widget.
How To Add this widget For blogger?.
This is very easy to do it two steps, step 1, choose your widget style,
and step 2, pate it’s code in your blogger template code.

Step 1. Choose the style And get your code.
  • Style 1. ( With Icon ) code, 

<b:if cond='data:blog.pageType == &quot;item&quot;'><div align='center' style='border:solid 2px #999999; padding:2px; margin:2px; width:100px; display:compact'><img height='16' src='http://forums.bit-tech.net/images-light/misc/stats.gif' width='16'/> <a href='http://toolsblogger.blogspot.com/'><b><font size='2'><script src='http://nirav07.ulmb.com/counter.php' type='text/javascript'/> Views</font></b></a></div></b:if>
  • Style 2. ( No Icon ) code, 
<b:if cond='data:blog.pageType == &quot;item&quot;'><div align='center' style='border:solid 2px #999999; padding:2px; margin:2px; width:100px; display:compact'><a href='http://www.allblogtools.com'><b><font size='2'><script src='http://nirav07.ulmb.com/counter.php' type='text/javascript'/> Views</font></b></a></div></b:if>
 Please copy your widget code and follow instructions in step 2.

Step 2. Add the widget for your blogger blog.
Now go to your blogger account then navigate to, Layout >> Edit html, And before doing any thing you must check Expand Widget Templates box.
And find the next Code

<div class='post-header-line-1'/>

And after it, paste your widget code You can get the widget code from previous step
What, If you didn’t find the code above in your template, The try to find the following,

<data:post.body/>

And paste the widget code Before it.
, after doing this, please click Save Template and you are done

Add Facebook Buttons and Widgets To Your Blogger blog

Posted by tris tecno Kamis, 04 November 2010 0 komentar

Facebook has already overtaken Yahoo according to the stats from Alexa. So along with search engine optimization, you should also try to bring some traffic from social networking sites like Facebook.


Add these buttons to your blog and help your visitors to share your articles easily on FB.
Instructions to follow:
Log in to Blogger -> Layout -> Edit HTML, and select the tickbox "Edit Widget Templates"
Now find this code in your template:


<div class='post-header-line-1'/>

Now immediately below it, paste the code for the facebook button (select the appropriate one for your blog).
 ________________________________________________________________________________


As a link:
Add Facebook link to your blog
Code to paste:


<!--FB-BUTTON-STARTS--><b:if cond='data:blog.pageType == &quot;item&quot;'>
<span style="text-align: right;">
<a name="fb_share" type="icon_link" href="http://www.facebook.com/sharer.php">Share</a><script src="http://static.ak.fbcdn.net/connect.php/js/FB.Share" type="text/javascript"></script>
</span></b:if><!--FB-BUTTON-STOPS-->
Button #1
Add Facebook link to your blog
Code to paste:

<!--FB-BUTTON-STARTS--><b:if cond='data:blog.pageType == &quot;item&quot;'><span style="text-align: right;">
<a name="fb_share" type="button_count" href="http://www.facebook.com/sharer.php">Share</a><script src="http://static.ak.fbcdn.net/connect.php/js/FB.Share" type="text/javascript"></script>
</span></b:if><!--FB-BUTTON-STOPS-->

Button #2
Add Facebook link to your blog
Code to paste:

<!--FB-BUTTON-STARTS--><b:if cond='data:blog.pageType == &quot;item&quot;'><span style="text-align: right;">
<a name="fb_share" type="box_count" href="http://www.facebook.com/sharer.php">Share</a><script src="http://static.ak.fbcdn.net/connect.php/js/FB.Share" type="text/javascript"></script>
</span></b:if><!--FB-BUTTON-STOPS-->

______________________________________________________________________
Other Facebook Widgets you can display on your blog:
1. Facebook Profile Badge
2. Facebook Photo Badges
3. Live Stream Box (Just like the twitter widget):
Facebook Live Stream Box

4. And visit this page to add a Facebook Fan Box Widget to your blog.

Add related posts for your Blogger blog

Posted by tris tecno 0 komentar

The related articles are chosen from other posts in that same category/label/tag. With this hack many of your readers will remain on your site for longer periods of time when they see related posts of interest.


Steps for Implementation:


  • Go to Layout >Edit HTML in your Blogger Dashboard.


  • Back up your existing Template before making any changes!


  • Make sure to check the "Expand Widget Templates" box.


  • Search for the </head> tag.


  • Add the following code just before the </head> tag.


  • <style> #related-posts { float : left; width : 540px; margin-top:20px; margin-left : 5px; margin-bottom:20px; font : 11px Verdana; margin-bottom:10px; } #related-posts .widget { list-style-type : none; margin : 5px 0 5px 0; padding : 0; } #related-posts .widget h2, #related-posts h2 { font-size : 20px; font-weight : normal; margin : 5px 7px 0; padding : 0 0 5px; } #related-posts a { text-decoration : none; } #related-posts a:hover { text-decoration : none; } #related-posts ul { border : medium none; margin : 10px; padding : 0; } #related-posts ul li { display : block; background : url("https://blogger.googleusercontent.com/img/b/R29vZ2xl/AVvXsEiqKhin6H25csQjQQRdZiLLOV6fPvrr-30XTv4blUNV1dcvRhETWF41aYiZUgHmnM_UHnj_Nplx_vUXRKGKtYbyGYSQ9kz3us7gCdUC_j8rJ8AlmJWlqCwg2aL2K2_OtPU_e-ZtVM32rBk/") no-repeat 0 0; margin : 0; padding-top : 0; padding-right : 0; padding-bottom : 1px; padding-left : 21px; margin-bottom : 5px; line-height : 2em; border-bottom:1px dotted #cccccc; } </style> <script src='http://theblogtemplates.com/scripts/Related_posts_hack.js' type='text/javascript'/>


    • Now search for <data:post.body/>. In some of the templates this code may look like this
    <div class='post-body>
    or
    <data:post.body/>


    • Add the following code just beneath the code you just searched for.

    <b:if cond='data:blog.pageType == "item"'>
    <div id="related-posts">
    <font face='Arial' size='3'><b>Related Posts : </b></font><font color='#FFFFFF'><b:loop values='data:post.labels' var='label'><data:label.name/><b:if cond='data:label.isLast != &quot;true&quot;'>,</b:if><b:if cond='data:blog.pageType == &quot;item&quot;'>
    <script expr:src='&quot;/feeds/posts/default/-/&quot; + data:label.name + &quot;?alt=json-in-script&amp;callback=related_results_labels&amp;max-results=5&quot;' type='text/javascript'/></b:if></b:loop> </font>
    <script type='text/javascript'> removeRelatedDuplicates(); printRelatedLabels();
    </script>
    </div></b:if>
    • Now Save your Template and you're done!
    Customization
    • In order to change the number of maximum related posts being displayed for each label, search for the code below (within the code given in step 7) and change the number "5" to any desired number.
    max-results=5

    6 Attractive Feedburner Email Subscription box for blogger

    Posted by tris tecno Minggu, 31 Oktober 2010 0 komentar

    Are you still using the same old subscription box from feedburner ??? Now its time to change your subscription box with new great features. You may have seen other sites having beautifull email subscription box and wanted to add in your blogger blog, So here are the most attractive subscription box list you always wanted..


     1. Stay Connected
     <a href='http://twitter.com/iblogerz' style='float: left; margin-right: 10px;' title='Follow us on Twitter'><img alt='Follow on Twitter' src='https://blogger.googleusercontent.com/img/b/R29vZ2xl/AVvXsEjKGw47-REeQvUvgVFYLqdi7crDgCLXDEIyAvwCUfyDan-tADtyF3KlFXfOlCrZxNYa7y1OHMQYnjJLjOW16QijsAo8_bhZFBeVRdCuAVm3NdJNV3e9eoJZeKBzfh88te0CvGfIOswdAJ4C/s800/break_the_egg_128px.png'/></a><div style='margin: 20px 0pt 0px 138px; overflow: hidden;'><a href='http://friendfeed.com/nirav07' title='Get connected over FriendFeed'><img alt='FF' src='http://i27.tinypic.com/144ar5.jpg'/></a><a class='linkopacity vtip' href='http://www.facebook.com/uscrap.co.cc' title='Lets be friends on facebook'><img alt='Facebook' src='http://i42.tinypic.com/20h21si.jpg'/></a><a class='linkopacity vtip' href='http://picasaweb.google.com/niravjain007/' title='Visit our Picasa Album'><img alt='Picasa' src='http://i40.tinypic.com/zv9zch.jpg'/></a><a class='vtip linkopacity' href='http://technorati.com/people/technorati/nirav07' title='Visit us at technorati'><img alt='Technorati' src='http://i41.tinypic.com/15i273q.jpg'/></a><a class='linkopacity vtip' href='http://digg.com/users/nirav07' title='Become friends on Digg'><img alt='Digg' src='http://i43.tinypic.com/2rr2zpy.jpg'/></a><a class='linkopacity vtip' href='http://nirav07.stumbleupon.com/' title='See what we have Stumbled upon!'><img alt='SU' src='http://i25.tinypic.com/2mzxqnt.jpg'/></a><a class='linkopacity vtip' href='http://www.youtube.com/user/niravjain007' title='See our YouTube Video Gallery'><img alt='UT' src='http://i29.tinypic.com/30wp4s3.jpg'/></a><a class='linkopacity vtip' href='http://www.orkut.co.in/Main#Profile.aspx?uid=15548331932883821176' title='Scrap us on Orkut'><img alt='Orkut' src='http://i26.tinypic.com/24y03o9.png'/></a><a href='http://technorati.com/faves?sub=addfavbtn&amp;add=http://www.bloggerwidgets.cz.cc' style='margin: 5px 0pt 0pt 30px; display: block;'><img alt='Add to Technorati Favorites' src='http://static.technorati.com/pix/fave/tech-fav-1.png'/></a>  <div style='margin: 10px 0pt 0pt; overflow: hidden; width: 200px;'>  <div style='float: left;'><script language='javascript' src='http://twittercounter.com/embed/?username=iblogerz&amp;style=black' type='text/javascript'/></div>
      <div style='float: right;'><a href='http://feeds.feedburner.com/bestwidgets'><img alt='' height='26' src='http://feeds.feedburner.com/%7Efc/bestwidgets?bg=87a0b0&amp;fg=000000&amp;anim=1' style='border: 0pt none ;' width='88'/></a></div>  </div></div><br/>
    <div style='margin: 0px auto; padding: 0pt 0pt 0pt 40px; background: transparent url(http://i44.tinypic.com/23syr83.jpg) no-repeat scroll left -8px; -moz-background-clip: -moz-initial; -moz-background-origin: -moz-initial; -moz-background-inline-policy: -moz-initial; width: 240px; text-align: left;'>
    <form action='http://feedburner.google.com/fb/a/mailverify' method='post' onsubmit='window.open(&apos;http://feedburner.google.com/fb/a/mailverify?uri=bestwidgets&apos;, &apos;popupwindow&apos;, &apos;scrollbars=yes,width=550,height=520&apos;);return true' target='popupwindow'>
    <p><input name='email' onblur='if(this.value==&apos;&apos;)this.value=&apos;Email address to subscribe&apos;' onfocus='if(this.value==&apos;Email address to subscribe&apos;)this.value=&apos;&apos;' style='width: 180px;' type='text' value='Email address to subscribe'/><input name='uri' type='hidden' value='bestwidgets'/><input name='loc' type='hidden' value='en_US'/><input type='submit' value='Go'/>
    </p></form></div><div style='margin: 0px auto; padding: 0pt 0pt 0pt 50px; background: transparent url(http://i40.tinypic.com/2ewo0zk.jpg) no-repeat scroll -5px center; -moz-background-clip: -moz-initial; -moz-background-origin: -moz-initial; -moz-background-inline-policy: -moz-initial; width: 305px; min-height: 50px; line-height: 4em;'>
    <a class='vtip' href='http://feeds2.feedburner.com/bestwidgets' title='Subscribe to our feeds to any reader to get regular updates for Free!'>Full RSS Subscription</a><a class='vtip' href='http://feeds2.feedburner.com/bestwidgets' title='Dont miss a single Featured post! Subscribe now'>Featured Posts</a><img src='http://i44.tinypic.com/2a8jc0g.jpg' style='border: medium none ; margin-bottom: -12px; margin-left: 2px;'/> </div>

    2. Subscribe uS
       <img alt='RSS' border='0' height='30' src='http://img708.imageshack.us/img708/3483/mailo.jpg' style='float: left; margin-right: 10px; margin-top: 10px;' width='30'/>          
        <form action='http://feedburner.google.com/fb/a/mailverify' method='post' onsubmit='window.open(&apos;http://feedburner.google.com/fb/a/mailverify?uri=bestwidgets&apos;, &apos;popupwindow&apos;, &apos;scrollbars=yes,width=550,height=520&apos;);return true' target='popupwindow'>
        <p><input maxlength='100' name='email' onfocus='this.value = &apos;&apos;;' size='25' style='background-color: rgb(255, 255, 160); margin-bottom: 2px; padding-left: 5px; width: 150px; padding-top: 2px; height: 16px;' type='text' valign='middle' value='Enter your email address'/>
        <input name='uri' type='hidden' value='bestwidgets'/>
        <input name='loc' type='hidden' value='en_US'/>
        <input type='submit' value='Subscribe'/></p>
        </form>
                <a href='http://feeds.feedburner.com/bestwidgets' title='Subscribe in a Feed Reader'>

                    <img alt='RSS' border='0' height='24' src='http://img138.imageshack.us/img138/4618/feedicon24x24.png' style='padding: 4px 10px 0pt 5px; float: left;' width='24'/>
                </a>
                <a href='http://feeds.feedburner.com/bestwidgets'><b>Subscribe to RSS Feed</b></a> |
                <a href='http://www.facebook.com/uscrap.co.cc' title='Add me as a Friend on Facebook'>
                    <img alt='Facebook' border='0' height='12' ilo-full-src='http://img138.imageshack.us/img138/5325/facebookru.png' src='http://img138.imageshack.us/img138/5325/facebookru.png' width='12'/>

                </a>
                <a href='http://technorati.com/faves?add=http://www.bloggerwidgets.cz.cc/' title='Add us to Technorati Favorite'>
                    <img alt='Technorati' border='0' height='12' ilo-full-src='http://img41.imageshack.us/img41/1631/technoratiq.png' src='http://img41.imageshack.us/img41/1631/technoratiq.png' width='12'/>
                <br/>
     </a><a href='http://twitter.com/iblogerz' title='Follow on Twitter'>

                    <img alt='Twitter' border='0' height='12' ilo-full-src='http://img41.imageshack.us/img41/1701/twitteruef.png' src='http://img41.imageshack.us/img41/1701/twitteruef.png' width='12'/>
                </a> <a href='http://twitter.com/iblogerz' title='Follow on Twitter'>Follow us on Twittter</a>
     <p style='margin-top: 10px;'>
    <a href='http://feeds2.feedburner.com/bestwidgets'><img alt='' height='26' src='http://feeds2.feedburner.com/%7Efc/bestwidgets?bg=3333&amp;fg=FFFFFF&amp;anim=1' style='border: 0pt none ;' width='88'/></a>
    <script type='text/javascript'>
    tweetmeme_screen_name = &#39;iblogerz&#39;;
    </script>
    <script src='http://tweetmeme.com/i/scripts/follow.js' type='text/javascript'/>
    <iframe allowtransparency='true' frameborder='0' scrolling='no' src='http://www.facebook.com/plugins/like.php?href=http%3A%2F%2Fwww.bloggwewidgets.cz.cc&amp;layout=button_count&amp;show_faces=false&amp;width=100&amp;action=like&amp;font=verdana&amp;colorscheme=light' style='border: medium none ; overflow: hidden; width: 100px; height: 20px; padding-top: 10px; padding-left: 5px;'/>
    </p><form action='http://www.facebook.com/addfriend.php' target='_blank'><input name='id' type='hidden' value='1737131433'/><img src='http://i45.tinypic.com/hvs3ft.jpg' style='margin: 0px; padding: 0px; width: 111px; height: 22px;'/></form>
     3.Subscribe
     <div style='background: rgb(255, 255, 255) url(http://img171.imageshack.us/img171/2742/rssbg.png) no-repeat scroll 0% 0%; -moz-background-clip: -moz-initial; -moz-background-origin: -moz-initial; -moz-background-inline-policy: -moz-initial; padding-top: 0px;'>
    <form action='http://feedburner.google.com/fb/a/mailverify' id='subscribe' method='post' onsubmit='window.open(&apos;http://feedburner.google.com/fb/a/mailverify?uri=bestwidgets&apos;, &apos;popupwindow&apos;, &apos;scrollbars=yes,width=550,height=520&apos;);return true' target='popupwindow'/>
    <p><a href='http://feeds.feedburner.com/bestwidgets' target='_blank' title='Subscribe To The Latest Posts'><img src='http://img171.imageshack.us/img171/162/rssicons.jpg' style='float: left; width: 38px; height: 38px; margin-right: 5px;'/></a><a href='http://feeds.feedburner.com/bestwidgets' target='_blank' title='Subscribe To The Latest Posts'><b><u>Subscribe to The RSS Feed</u></b></a>
    and We will let you know when we have new posts !</p><br/>
    <div style='text-align: center;'><b>Get The Latest Full Posts By Email - It&#39;s Free</b><br/><input id='subbox' name='email' onblur='if (this.value == &apos;&apos;) {this.value = &apos;Enter your email address...&apos;;}' onfocus='if (this.value == &apos;Enter your email address...&apos;) {this.value = &apos;&apos;;}' style='width: 215px;' type='text' value='Enter your email address...'/>
                        <input name='uri' type='hidden' value='bestwidgets'/>            <input name='loc' type='hidden' value='en_US'/>                     <input id='subbutton' type='submit' value='OK'/>                  <div style='clear: both;'/> <center><table border='0'> <tbody><tr> <td><a href='http://www.facebook.com/pages/Junks-Blogger/109882239030703' target='_blank' title='Connect to Us On Facebook'><img src='http://img29.imageshack.us/img29/3497/facebookiconf.jpg' style='width: 54px; height: 54px;'/></a></td><td><a href='http://twitter.com/iblogerz' target='_blank' title='Follow Us'>
    <img src='http://img291.imageshack.us/img291/3765/twittericon.jpg' style='width: 54px; height: 54px;'/></a>
    </td><td> </td><td><a href='http://feeds.feedburner.com/bestwidgets'><img alt='Fellow Readers' height='26' src='http://feeds.feedburner.com/%7Efc/bestwidgets?bg=000000&amp;fg=FFFFFF&amp;anim=1' style='border: 0pt none ; padding-top: 5px;' width='88'/></a>
    <div id='TwitterCounter'><a href='http://twittercounter.com/hedy7?from=button' target='_blank' title='TwitterCounter for iblogerz'><img alt='TwitterCounter for iblogerz' height='26' src='http://srv2.twittercounter.com/counter/ani/iblogerz/ffffff/111111' style='border: medium none ;' width='88'/></a></div></td> </tr> </tbody></table></center> </div></div>

    4.Thrilling Subscribe
      <a href="http://feeds2.feedburner.com/bestwidgets" title="Subscribe to the RSS feed"><img alt="RSS" src="http://i50.tinypic.com/esnlvc.jpg" style="float: left; vertical-align: middle; padding-right: 10px;" border="0" /></a>
    <p style="padding: 5px 0pt;"><a href="http://feeds2.feedburner.com/bestwidgets" title="Subscribe to updates via RSS">Grab the RSS feed for Free Updates!</a><br />(What's this? — <a href="http://www.youtube.com/watch?v=0klgLsSxGsU" target="_blank" title="RSS in Plain English">Learn more about RSS</a>)</p>
    <br />
    <a href="http://feedburner.google.com/fb/a/mailverify?uri=bestwidgets" title="Get email updates delivered to your email inbox!"><img alt="subscribe" src="http://i45.tinypic.com/xmk8w6.jpg" style="float: left; vertical-align: middle; padding-right: 10px;" border="0" /></a>
    <p style="padding: 5px 0pt;">OR Get blog updates sent directly to your inbox by entering your email address below:</p>
    <form action="http://feedburner.google.com/fb/a/mailverify" method="post" onsubmit="window.open(\" http:="" feedburner.google.com="" fb="" a="" mailverify?uri="bestwidgets\'," popupwindow\="" ,="" \="" scrollbars="yes,width=550,height=520\');return" true="" style="text-align: center;" target="popupwindow">
    <input name="email" style="width: 140px;" type="text" />
    <input name="uri" value="bestwidgets" type="hidden" />
    <input name="loc" value="en_US" type="hidden" />
    <input onmouseover="style.cursor=\" pointer\="" style="margin: 5px; cursor: pointer;" value="Subscribe" type="submit" />
    </form>

    5.Email Subsciption Box

    <!-- Email subsciption box -->
    <form id="subscribe" action="http://feedburner.google.com/fb/a/mailverify" method="post" target="popupwindow" onsubmit="window.open('http://feedburner.google.com/fb/a/mailverify?uri=Your-FeedBurner-Feed ', 'popupwindow', 'scrollbars=yes,width=550,height=520');return true"><b>Like This Blog's Posts?</b> Get the Latest of It Directly from your Inbox for Free - Enjoy your Day!<br />
    <div style="text-align:center">
    <input type="text" value="Enter your email address..." id="subbox" onfocus="if (this.value == &#39;Enter your email address...&#39;) {this.value = &#39;&#39;;}" onblur="if (this.value == &#39;&#39;) {this.value = &#39;Enter your email address...&#39;;}" name="email" style="width:250px;" />
    <input type="hidden" value="Your-FeedBurner-Feed " name="uri" />
    <input type="hidden" name="loc" value="en_US" />
    <input type="submit" value="OK" id="subbutton" />
    </div></form>

    <div>
    <center>
    <table>
    <tr>
    <td>
    <a href="http://feeds.feedburner.com/Your-FeedBurner-Feed "><img src="http://feeds.feedburner.com/~fc/Your-FeedBurner-Feed ?bg=99CCFF&amp;fg=111111&amp;anim=1" height="26" width="88" style="border:0" alt="" /></a>
    </td><td>
    <script type="text/javascript" language="JavaScript" src="http://twittercounter.com/embed/Your-Twitter-User-Name/111111/99CCFF"></script>
    </td>
    </tr>
    </table></center>
    </div>

    <div style="padding-left:10px;">
    <table>
    <tr><td>
    <a href="http://feeds.feedburner.com/Your-FeedBurner-Feed " target="_blank" title="Subscribe To The Latest Posts"><img style="float:left; margin-right:5px; width:20px; height:20px;" src="http://img243.imageshack.us/img243/2619/10rssicon.png" /></a><a href="http://feeds.feedburner.com/Your-FeedBurner-Feed " target="_blank" title="Subscribe To The Latest Posts">Subscribe to The RSS Feed</a>
    </td></tr>
    <tr><td>
    <a href="Your-Facebook-Page-Url" target="_blank" title="Facebook time"><img style="float:left; margin-right:5px; width:20px; height:20px;" src="http://img163.imageshack.us/img163/8637/10facebookicon.png" /></a>
    <a href="Your-Facebook-Page-Url" target="_blank" title="Facebook time">Connect via Facebook</a>
    </td></tr>
    <tr><td>
    <a href="http://twitter.com/Your-Twitter-User-Name" target="_blank" title="Twitter time"><img style="float:left; margin-right:5px; width:20px; height:20px;" src="http://img189.imageshack.us/img189/6853/10twittericon.png" /></a><a href="http://twitter.com/Your-Twitter-User-Name" target="_blank" title="Twitter time">Follow Us on Twitter</a>
    </td></tr>
    </table></div>
    <!-- /Email subsciption box -->

    6. Animated Subscription
    Requested by ross1004

    <style>
    #feeds {font-size:12px;width:275px;height:141px; background: url(http://2.bp.blogspot.com/_PqwYYUlzOtg/S9nOx7Bf0RI/AAAAAAAABlM/4BwNBsDdAuI/s1600/feedbg.png);background-position: 0 0;margin-bottom:10px;}
    #feeds:hover {
        background-position: 0 -141px;
    }
    #feeds .alt { display: none; }</style>
    <div id='feeds'>
            <form action='http://feedburner.google.com/fb/a/mailverify' method='post' onsubmit='window.open(&apos;http://feedburner.google.com/fb/a/mailverify?uri=bestwidgets&apos;, &apos;popupwindow&apos;, &apos;scrollbars=yes,width=550,height=520&apos;);return true' target='popupwindow'>
            <input class='textarea' name='email' onblur='if (this.value == &apos;&apos;) {this.value = &apos;Enter email address here&apos;;}' onfocus='if (this.value == &apos;Enter email address here&apos;) {this.value = &apos;&apos;;}' type='text' value='Enter email address here'/><br/>
              <input name='uri' type='hidden' value='Subscribe'/> <input name='title' type='hidden' value='bestwidgets'/> <input name='loc' type='hidden' value='en_US'/>
            </form>
            <p><a href='http://feeds2.feedburner.com/bestwidgets'><img alt='' height='26' src='http://feeds2.feedburner.com/~fc/bestwidgets?bg=2d2d2b&amp;fg=cfcfcf&amp;anim=1' style='border:0' width='88'/></a></p>
            <p><a expr:href='data:blog.homepageUrl + &quot;feeds/posts/default&quot;'>Post (RSS)</a> | <a expr:href='data:blog.homepageUrl + &quot;feeds/comments/default&quot;'>Comments (RSS)</a></p>
          </div>
    Ping your blog, website, or RSS feed for Free