Download : Sporty Magazine 2 ( Blogger template )

Posted by tris tecno Kamis, 15 Desember 2011 1 komentar
Name : Sporty Magazine 2
Author : Herdiansyah Hamzah
Url Author : Herdiansyah Hamzah
Designer : Borneo Templates
Url Designer : Borneo Templates
Published : Borneo Templates
Url Published : Borneo Templates

Description and Featured :
Sporty Magazine 2 is blogger template with premium looks, professional design, menu navigation dropdwon,
featured slidehow content, news ticker, twitter widget, 3 column main page, 5 column footer page, social bookmark on postpage, all image host on blogger, SEO ready, and time script on top.

Sporty Magazine 2 Privacy Policy : First, do not change the credit link at the bottom of this template. delete or modify this template links, as well as premises did not appreciate my work. Second, this template for free, not for sale. for it is forbidden to sell this template to any company or business without my knowledge, and Third, after you see a live demo of this template, please leave your comment. this is important as an input for me to make a template that is much better in the future.


TUTORIALS HOW TO USE SPORTY MAGAZINE 2

First step, you have to download Sporty Magazine 2 files. After that, follow the instruction below.


Menu Navigation Dropdown

To set this menu, please go to your HTML stukrut page (no need to expand), then scroll down and find the following code : <div id='menuwrapperpic'>
(Notes : for quick search, press the F3 key, type the code above and enter). After this code, you will find menu navigation dropdwon below :
<div id='menuwrapperpic'>
<div id='menuwrapper'>
<ul id='menubar'>
<li class='selected'><a href='/'><img border='0' src='https://blogger.googleusercontent.com/img/b/R29vZ2xl/AVvXsEgJ-qYinlSnMdiVNtu0t2eALK8JYHl-r7QmDZ1ym6JHfYu_EIbClY4I131571NleiMRCwDLbf2TI19kwz56KoOo_q5OPapEKrVs3DCIr5PbpsLhvCs6iNtP05pK5Ag_GoPab0oVQ85jpx8/s1600/home_white.png' style='padding:0px;'/></a></li>
<li class='selected'><a href='#'>About Us</a></li>
<li><a class='trigger' href='#'>Contact Us</a>
<ul>
<li><a href='#'>Herdiansyah Blog</a></li>
<li class='hr'/>
<li><a href='#'>Contact on Facebook</a></li>
<li><a href='#'>Contact on Twitter</a></li>
<li class='hr'/>
<li><a href='#'>Free Template Design</a></li>
</ul>
</li>
<li><a href='#'>Moto GP</a></li>
<li><a href='#'>Football</a></li>
<li><a href='#'>Formula 1</a></li>
<li><a href='#'>Web Design</a></li>
<li><a href='#'>Free Template</a></li>
<li><a href='#'>Videos</a></li>
<li><a href='#'>Image</a></li>
<li><a href='#'>Download</a></li>
<li><a class='trigger' href='#'>More</a>
<ul>
<li><a href='#'>Editorial</a></li>
<li class='hr'/>
<li><a href='#'>Off Topic</a></li>
</ul>
</li>
</ul>
<br class='clearit'/>
</div>
<div style='clear:both;'/>
</div>

Notes : change the code # with your link url address, and name labels with your label or categories.
News Ticker
First step, you have to register your blog to API Google Code and you will see your API code. After that, find this code below on your edit HTML tabs :
<!-- News Ticker -->
<script src='http://www.google.com/jsapi?key=ABQIAAAA4qkT5i26SQ6NmgJd5KQemhRQ_a6zv5_Bim3H_GL4gaueIFZ15xRdt8jcAUk8ZHokIVo-TBZgYVbkzw'/>

Notes : replace the blue code, with yourAPI Key.

Next step, you have to change your url link to make it news ticker appear with your latest post. Find this code below on edit HTML tabs.
<div class='newspic'>
<div class='news'>
<div style='float:left;padding:5px 60px 5px 0;font:bold 14px Arial;color:#333;text-transform:none;'>News Update :</div>
<div style='float:left;width:800px;padding:4px 0; position:relative; overflow:hidden;'>
<script type='text/javascript'>
var cssfeed=new gfeedrssticker(&quot;example1&quot;, &quot;example1class&quot;, 4000, &quot;_new&quot;)
cssfeed.addFeed(&quot;News Update&quot;, &quot;http://sportymagazine2.blogspot.com/feeds/posts/default&quot;) //Specify &quot;label&quot; plus URL to RSS feed
cssfeed.displayoptions(&quot;date&quot;) //show the specified additional fields
cssfeed.setentrycontainer(&quot;div&quot;) //Wrap each entry with a DIV tag
cssfeed.filterfeed(10, &quot;date&quot;) //Show 10 entries, sort by date
cssfeed.entries_per_page(1)
cssfeed.init()
</script>
</div>
</div><div style='clear:both;'/>
</div>

Notes : replace the red code, with your site/blog url link.

Featured Slideshow Content
First step, add new html/java script widget on your page. Put this code below :
<div id='featured'>
<ul class='ui-tabs-nav'>

<!-- 1st Small Image -->
<li class='ui-tabs-nav-item ui-tabs-selected' id='nav-fragment-1'><a href='#fragment-1'><img alt="" src="#" /><span>Post Title</span></a></li>

<!-- 2st Small Image -->
<li class='ui-tabs-nav-item' id='nav-fragment-2'><a href='#fragment-2'><img alt="" src="#" /><span>Post Title</span></a></li>

<!-- 3st Small Image -->
<li class='ui-tabs-nav-item' id='nav-fragment-3'><a href='#fragment-3'><img alt="" src="#" /><span>Post Title</span></a></li>

<!-- 4st Small Image -->
<li class='ui-tabs-nav-item' id='nav-fragment-4'><a href='#fragment-4'><img alt="" src="#" /><span>Post Title</span></a></li>
</ul>

<!-- First Content -->
<div class='ui-tabs-panel' id='fragment-1' style=''>
<img alt="" src="#" />
<div class='info'>
<h2><a href=' your-url-link '>Post Title</a></h2>
</div></div>

<!-- Second Content -->
<div class='ui-tabs-panel ui-tabs-hide' id='fragment-2' style=''>
<img alt="" src="#" />
<div class='info'>
<h2><a href=' your-url-link '>Post Title</a></h2>
</div></div>

<!-- Third Content -->
<div class='ui-tabs-panel ui-tabs-hide' id='fragment-3' style=''>
<img alt="" src="#" />
<div class='info'>
<h2><a href=' your-url-link '>Post Title</a></h2>
</div></div>

<!-- Fourth Content -->
<div class='ui-tabs-panel ui-tabs-hide' id='fragment-4' style=''>
<img alt="" src="#" />
<div class='info'>
<h2><a href='your-url-link'>Post Title</a></h2>
</div></div>
</div>
Notes : replace red code (#) with your image url link, orange code (Post Title) with your post title, and blue code (your-url-link) with your url link post.

Featured Label Categories
First step, open your blog page and add new HTML/Java Script widget. Next step, put this code below :
<script type='text/javascript'>var numposts = 3;var showpostthumbnails = true;var displaymore = false;var displayseparator = false;var showcommentnum = false;var showpostdate = false;var showpostsummary = true;var numchars = 60;</script>

<script type="text/javascript" src="/feeds/posts/default/-/Borneo?orderby=updated&alt=json-in-script&callback=labelthumbs"></script>
Notes : Change orange code (3), with number of post will be appear, and red code (Borneo) with your label or categories.

Twitter Widget (Live Updates)
Open your page elements and put this code below with add new HTML/Java Script.
<div style="background:#fff url(https://blogger.googleusercontent.com/img/b/R29vZ2xl/AVvXsEgOL81w_9l0zdNDL8M8-YDFBUZw7m0FJCHcSX30eqynUYIeANogOM9ImgwwWoRYktTvD8f9bQn-LHBo_cCcuX0fxS6bWcF365tKV9f17Y8lCOkpw1DDl1RHjhC7Safz2gR_6spmgpcj1Cs/s1600/bg_twitter.gif) no-repeat;padding-top:40px;padding-left:5px">
<script src="http://widgets.twimg.com/j/2/widget.js"></script>
<script>
new TWTR.Widget({
version: 2,
type: 'profile',
rpp: 10,
interval: 3000,
width: 285,
height: 118,
theme: {
shell: {
background: 'transparent',
color: '#000000'
},
tweets: {
background: 'transparent',
color: '#000000',
links: '#B45F04'
}
},
features: {
scrollbar: true,
loop: true,
live: true,
hashtags: true,
timestamp: true,
avatars: false,
behavior: 'default'
}
}).render().setUser('borneotemplates').start();
</script>
</div>
Notes : change orange code (borneotemplates) with your twitter username.

Search Widget
Open your page elements and put this code below with add new HTML/Java Script.
<form name="jksearch" action="http://www.google.com/search" method="get" onsubmit="jksitesearch(this)" target="_blank">

<input id="hiddenquery" type="hidden" name="q" />
<input name="qfront" onfocus="if(this.value==this.defaultValue)this.value=&#39;&#39;;" value="Search on this site..." type="text" onblur="if(this.value==&#39;&#39;)this.value=this.defaultValue;" style="width: 240px;border:none;padding:8px 10px; font:normal 11px arial;color:#666; background:url(https://blogger.googleusercontent.com/img/b/R29vZ2xl/AVvXsEhOm6ikH3kgZL5J3In0Bcww5EVehLWSqEKI_8rwV28wdEM7abOyedjVP37SyWix0VFDu1lI5uzwAJbfAj-Euel_lBWm6F4UM9xTcTxcoUkHkGRYB-i8qnpZMSCt_exuHqFRRvnE8ISO1Q4/s1600/search_field.jpg) no-repeat;" /><input type="image" src="https://blogger.googleusercontent.com/img/b/R29vZ2xl/AVvXsEhGW-329rN8rpHo6LdoBRJHuddAVYPZVYqSq7xk2XLKqVlYA7MN2Z2NU6mKfIZ_TCk4nsX4op4vD3JXtnn0csf1qJ08-R3s6ewjJ4bfXPlWWh45Pmv4LfWFKASA2VMmcJat3k3aXxFCafQ/s1600/search_button.jpg" align="top" value="Search"/>

<div style="font: normal 11px Arial;color:#666;padding:2px 0;">
<input name="se" type="radio" checked /> Google
<input name="se" type="radio" /> Yahoo
<input name="se" type="radio" /> Msn
</div>

<script type="text/javascript">

// All-in-one Internal Site Search script- By JavaScriptKit.com (http://www.javascriptkit.com)
// For this and over 400+ free scripts, visit JavaScript Kit- http://www.javascriptkit.com/
// This notice must stay intact for use

//Enter domain of site to search.
var domainroot="www.borneotemplates.com"

var searchaction=[ //form action for the 3 search engines
"http://www.google.com/search",
"http://search.yahoo.com/search",
"http://search.msn.com/results.aspx"
]

var queryfieldname=["q","p","q"] //name of hidden query form for the 3 search engines

function switchaction(cur, index){
cur.form.action=searchaction[index]
document.getElementById("hiddenquery").name=queryfieldname[index]
}
function jksitesearch(curobj){
for (i=0; i< document.jksearch.se.length; i++){ //loop through radio to see which is checked
if (document.jksearch.se[i].checked==true)
switchaction(document.jksearch.se[i], i)
}
document.getElementById("hiddenquery").value="site:"+domainroot+" "+curobj.qfront.value
}
</script>
</form>
Notes : change orange code (www.borneotemplates.com) with your twitter username.

Thats it, happy blogging. If you have question about Sporty Magazine 2 Templates, please leave your comment below or contact me via email on mail [at] borneotemplates.com.

Recent Posts Widget with Thumbnails

Posted by tris tecno Rabu, 14 Desember 2011 0 komentar
At least some of you would be familiar with My "Recent Posts with Thumbnails" Gadget for Blogger. I had got so many complaints that the Gadget fails to load or has some issues. So I decided to make a Widget version of the same.


Why the other Gadget fails at times?

The other gadget is made using the Gadget API. The API renders the gadget as an iFrame with all the parameters appended to the iFrame URL. When the iFrame url becomes too big, browsers have issues rendering the gadget. This primary reason behind this is that the API appends so many style parameters to the iFrame URL thereby making it pretty lengthy.The current page url is also a parameter.That is why some people complain that it is working on the home page, whereas it doesn't work on some of the post pages. The reason is that your home page url is shorter in length than your post page url. So it is almost impossible to make the gadget error free.

So What now?

This new Widget doesn’t rely on the Gadget API, and is not loaded as an iFrame. This is a plain JavaScript widget, and will work across all browsers.

What’s special about this new Widget?

If you are good at CSS, you can make the widget exactly as you want. There is no limit in customizing this Widget. This doesn’t mean that it is useful only to those who are familiar with CSS. The Widget by default will inherit your Blog’s Styling. So it should look pretty neat with the default Styling

Options in the Widget Installer

  1. Blog URL: This should be the URL of a blogger Blog. If you are installing the Widget on the same blog then you can leave this field blank . This field is useful for those who have multiple blogs..
  2. Number of Posts – The number of posts displayed in the Widget
  3. Maximum title Length – This option can be used to chop off really long Post Titles. If a post title is longer than this length, the widget will chop off the rest of the title
  4. Show Thumbnail – It’s pretty much obvious from the name
  5. Show Default Thumbnail – If this option is selected, and your post doesn’t have an image, then a default image will be displayed.
  6. Thumbnail Dimension – The gadget can generate square thumbnails of any size. Use this option to set the dimension of the thumbnail.
  7. Float Thumbnail to – This option can be used to align the image thumbnail to the left or to the right
  8. Thumbnail Margin – You can set a 5px margin to the image, so that the thumbnail stays apart from the post summary. You can override the margin by selecting No.(You can then manually style it using CSS)
  9. Show summary
  10. Summary size – If summary is more than this length, then the widget will chop off the rest
  11. Show post date
  12. Show Comment Number
  13. Show Read more Link
  14. Read More Text – This is the Text Shown on the Read More Link
  15. Use Full Feed – By default the Widget will use the Blogger Summary feed which is smaller in size. If you select the Full Feed option, it will use the Full Feed which is bigger in size, and hence the Widget would get slower. The advantage is that, you would get thumbnails of YouTube videos that you have posted.
  16. Sorting – Helps you in displaying the recently published posts or recently updated posts.
Now that you are clear with the options, use the below button to add the Widget to your Blog.
Add Recent Posts Widget

Advanced Options:

1. Default Thumbnail
If the Widget is unable to find an image in the Post and if Options 4 and 5 are checked, then the Gadget will use the following image by default

If you want to change this default thumbnail, then you will have to first upload the Thumbnail somewhere. The best place to upload is blogger. So create a new post(or edit an existing one) and add the image to the post. Now Switch to the Edit HTML view of the Post Editor. There you will find a URL which contains “/s1600/” in it. Copy that URL. Change /s1600/ to /s72-c/. So finally you will get some URL like
https://blogger.googleusercontent.com/img/b/R29vZ2xl/AVvXsEiFv_UaqdxzG60woQocMhs91SS_iKjVEfAdHyHCqOZpY0brFb4B-6MEB5jTy7jiq48-Uo2iOzAX_BFTOi1Itj6TCwBhmrqpGP6hvUqazlQ_zEaVcqiUZP54P2Bvp0dLvbjCYP6SyOvknn4/s72-c/default.png
This is your default Thumbnail's URL. Now it’s time to tell the script to make use of this Image. For that Edit the HTML/JavaScript Widget(Recent Posts) and add the following variable:
var defaultImage=”THUMBNAIL_URL_WHICH_HAS_/s72-c/_IN_IT”;
(Off course you will have to edit the above line)
If you are not sure where to add the variable, then add it just before
var numberOfPosts
Save the Gadget and you are done.
2. CSS Styling:
If you are using CSS Styling, make sure that the Thumbnail Margin is set to None. You can also set the Thumbnail Float to None. This will prevent the Widget JavaScript from adding any Styles to the Post List.
You can add your CSS at Template Designer > Advanced > Add CSS
Some Sample CSS snippets are there in the comments.
3. Tracking the Widget Usage
I have appended a utm_src parameter to the recent post URLs.This will help you in tracking the widget usage from your Google Analytics account(Traffic Sources > Campaigns).
4. Remove the Powered By Link
If you can’t stand the powered by Link at the bottom of the widget, then you can hide it. To do that Add this CSS snippet :( :(

.bp_footer{display:none;}

If you don’t know how to add CSS read the CSS Styling (2) part in these Advanced Options.

Hmmm at the moment, I’m a little lazy to create a Demo Blog. You can expect that sometime soon.

If you have any doubts or questions or suggestions, feel free to comment here and I will try my best to reply to each of your comments.

I know that many bloggers are having issues in using the old Gadget. So kindly help others by sharing this new post :)

Related Posts Widget for Blogger with Thumbnails

Posted by tris tecno 0 komentar
Displaying the links to related posts along with a thumbnail of the corresponding post will help you increase the page views/user .Users will be tempted to go for the related posts when they are presented attractively with thumbnails.


This is another first release from me.This one also uses the media thumbnails generated by blogger for each post.

For displaying the thumbnails,this widget will use the images uploaded for the post using the blogger image uploader(from the post editor) [Update - Now supports external images also.]
Related Posts Widget with Thumbnails for Blogger

Here are the detailed steps to install the related posts widget for blogger with thumbnails

1.First of all Login to your blogger dashboard and navigate to Layout > Edit HTML and check the "Expand Widget Templates" check box

2.Now look for

</head>

and replace it with

<!--Related Posts with thumbnails Scripts and Styles Start-->
<!-- remove --><b:if cond='data:blog.pageType == &quot;item&quot;'>
<style type="text/css">
#related-posts {
float:center;
text-transform:none;
height:100%;
min-height:100%;
padding-top:5px;
padding-left:5px;
}

#related-posts h2{
font-size: 1.6em;
font-weight: bold;
color: black;
font-family: Georgia, &#8220;Times New Roman&#8221;, Times, serif;
margin-bottom: 0.75em;
margin-top: 0em;
padding-top: 0em;
}
#related-posts a{
color:black;
}
#related-posts a:hover{
color:black;
}

#related-posts a:hover {
background-color:#d4eaf2;
}
</style>
<script type='text/javascript'>
var defaultnoimage="https://blogger.googleusercontent.com/img/b/R29vZ2xl/AVvXsEjHesfHSrSjXWLuZ9cd2p0tLDYcmiF8A7Zl_TM_unWvnsj0CTfcfz1mnMjZanjCaEMf1-Unxa38ObnCBXrqmcvpBs7AagCSknC34dlErQBAn4V_F2aooeBYWngJTjP-gnen7Si98F3CgVw/s400/noimage.png";
var maxresults=5;
var splittercolor="#d4eaf2";
var relatedpoststitle="Related Posts";
</script>
<script src='http://blogergadgets.googlecode.com/files/related-posts-with-thumbnails-for-blogger-pro.js' type='text/javascript'/>
<!-- remove --></b:if>
<!--Related Posts with thumbnails Scripts and Styles End-->
</head>

3.Now Find

<div class='post-footer-line post-footer-line-1'>

If you cant find it then try finding this one

<p class='post-footer-line post-footer-line-1'>

Now immediately after any of these lines(whichever you could find) place this code snippet

<!-- Related Posts with Thumbnails Code Start-->
<!-- remove --><b:if cond='data:blog.pageType == &quot;item&quot;'>
<div id='related-posts'>
<b:loop values='data:post.labels' var='label'>
<b:if cond='data:label.isLast != &quot;true&quot;'>
</b:if>
<script expr:src='&quot;/feeds/posts/default/-/&quot; + data:label.name + &quot;?alt=json-in-script&amp;callback=related_results_labels_thumbs&amp;max-results=6&quot;' type='text/javascript'/></b:loop>
<script type='text/javascript'>
removeRelatedDuplicates_thumbs();
printRelatedLabels_thumbs(&quot;<data:post.url/>&quot;);
</script>
</div><div style='clear:both'/>
<!-- remove --></b:if>
<b:if cond='data:blog.url == data:blog.homepageUrl'><b:if cond='data:post.isFirstPost'>
<a href='http://www.bloggerplugins.org/2009/08/related-posts-thumbnails-blogger-widget.html'><img style="border: 0" alt="Related Posts Widget For Blogger with Thumbnails" src="http://image.bloggerplugins.org/blogger-widgets.png" /></a><a href='http://bloggertemplates.bloggerplugins.org/' ><img style="border: 0" alt="Blogger Templates" src="http://image.bloggerplugins.org/blogger-templates.png" /></a>
</b:if></b:if>
<!-- Related Posts with Thumbnails Code End-->

4.You can adjust the maximum number of related posts being displayed by editing this line in the code.

var maxresults=5;

5.To edit the title of the widget you can change this line of code

var relatedpoststitle="Related Posts";

6.To change the default thumbnail, you can edit this line of code

var defaultnoimage="https://blogger.googleusercontent.com/img/b/R29vZ2xl/AVvXsEjHesfHSrSjXWLuZ9cd2p0tLDYcmiF8A7Zl_TM_unWvnsj0CTfcfz1mnMjZanjCaEMf1-Unxa38ObnCBXrqmcvpBs7AagCSknC34dlErQBAn4V_F2aooeBYWngJTjP-gnen7Si98F3CgVw/s400/noimage.png";

7.To Change the Colour of the Splitter Line , edit

var splittercolor="#d4eaf2";

To change the other colours and all you will have to modify the CSS

If you fall into troubles implementing this,don't panic.. :) .just leave me a comment here and i will help you out. If you like to give me any suggestions on how to improve this widget,then it would be really great.
How to display the related posts on every page and not only on the post pages?

Just remove the two lines starting with from both step 3 and step 2.

that is lines

<!-- remove --><b:if cond='data:blog.pageType == &quot;item&quot;'>

and

<!-- remove --></b:if>

Download : Xanadu ( Blogger Template )

Posted by tris tecno 0 komentar


* Free Blogger Template for most blogs
* Left sidebar, 2 columns, fixed width, nice slider
* 2 menu bar, search box, social icons, ready
* Premium blogger template for free
 

Download : Lock Heart ( Blogger template )

Posted by tris tecno 0 komentar

How To Moving Your Blog From Blogger To WordPress Without Losing Traffic And SEO

Posted by tris tecno 0 komentar
Moving from blogger to wordpress has quite lots of advantages ranging from better SEO to freedom to do ‘whatever’. That’s not the main issue here and I suggest you read this post if you’re wondering whether you need to use wordpress or blogger. If you’ve already made up your mind and want to move your blog posts and comments from blogger to wordpress without breaking anything, read on.
We’re surely achieving four major aims by doing this:

1. Moving all blog posts and comments

2. Maintaining all links without generation any error 404

3. Retaining feed subscribers, posts facebook likes and tweets

4. Maintaing your traffic and google pagerank

Seriously, importing your blog posts from blogger to wordpress and so simple and you should be done in just a few minutes if you followed everything correctly. Hey, I’m assuming your blogger’s blog is already hosted under a custom domain, right? If you’re still using a blog spot sub domain, it might be a bit difficult achieving all the four goals set above. The only thing you can do in such case is to redirect your blogspot site to your new domain on wordpress but this isn’t even ideal. The best way to migrate is when you already have blogger’s blog pointed to a custom doamain, the domain you’re gonna be using for your wordpress site.

You still don’t understand? Well, my blogspot site was www.doncaprio.com, ok? And I chose to move my stuffs from blogger to wordpress still using the same www.doncaprio.com. All the goals set above would have been impossible to meet if I was using doncaprio.blogspot.com, the only thing I could do was to redirect traffic from doncaprio.blogspot.com to www.doncaprio.com.

The move is super easy if you already have your blogspot site running on a custom domain for a long time.

Alright, enough of the story and back to the real business!

1. If your blogspot site is using the same domain you want to use for your new wordpress blog, go to blogger settings and revert back to publishing under blogspot sub doamin.

2. Set your DNS entries to point to your hosting account and Install wordpress. It’s easier doing it using the auto installer on your cPanel. Log in to cPanel and locate Fantastico Deluxe, Simple Scripts, Elephante Installer or any other one-click installer provided by your web host.

3. From your WordPress Dashboard, go to Settings > Permalinks and then select Custom Structure option. Paste the following value next to it and save changes.

/%year%/%monthnum%/%postname%.html

The main essence of this is to keep your permalinks intact, making them look like blogger URLs. Personally, I won’t advice you to use something different at this time but you can definitely change it later. I’m not sure I’m gonna change mine because it means reverting facebook like counts back to zero whereas I have a single post with almost 700 facebook likes! :) I don’t wanna lose that :(

4. The next step is importing your blog posts from wordpress to blogger. Go to Tools -> Import options and select Blogger options.

5. A pop-up box will appear, click on Install Plugin to install the importer plugin in WordPress.


6. Click on Activate Plugin & Run Importer. You’re asked to grant access to your google account. Click on Grant Access and you may be prompted to login to your google account if you’re not already signed in.


7. Once you grant access, you will be taken back to the Blogger importer on WordPress. If you have more than one blog on your Blogger account, you will see all of them listed here. Just click on the import button next to the blog that you want to import into WordPress.


8. Now you have to wait for some minutes because the time it’s going to take depends on the number of posts you have. I imported 271 posts and over 1000 comments in less than five minutes.

At this point, you should note that only blog posts and comments are imported, your static pages are not imported. You have to do this manually.

If the import button changes to continue, hit the button till the process completes and Set Authors is displayed on the button.

9. You can now refresh your wordpress blog and see your posts on blogger show up. Wait a minutes, we’re not done here.

10. In step 3, we configured wordpress permalinks to look similar to blogger permalinks in order to retain traffic and search engine optimization, right? There’s likely to be a little problem though – wordpress links may look a bit longer than your original blogger permalinks.

http://www.yourblog.com/2011/how-to-move-you-blog-posts-from.html

It’s gonna look like this when it becomes a wordpress permalink:

http://www.yourblog.com/2011/how-to-move-you-blog-posts-from-blogger-to-wordpress-without-losing-traffic.html

Both permalinks have the same structure but the slug is different and we must make it look exactly like it was on blogger in order to make search traffic point to that very blog post instead of your visitors getting Error 404 (Not Found).

Copy the code below to a notepad and save it as fixlinks.php

<?php
require_once(â??wp-load.phpâ??);
$res = $wpdb->get_results(â??SELECT post_id, meta_value FROM $wpdb->postmeta WHERE meta_key = â??blogger_permalinkâ??â??);
$wpdb->print_error();
foreach ($res as $row){
$slug = explode(â??/â??,$row->meta_value);
$slug = explode(â??.â??,$slug[3]);
$wpdb->query(â??UPDATE $wpdb->posts SET post_name =â??â?? . $slug[0] . â??â?? WHERE ID = $row->post_idâ??);
$wpdb->print_error();
}
echo â??DONEâ??;
?>

11. Now upload this to your public_html or the folder in which your wordpress blog is installed. Run the script like this: http://your-blog.com/fixlinks.php

The moment you do this, you should see DONE written on your computer screen. That’s all, the permalinks are now fixed.

You can run a search on google for your old blog posts and click on it to verify if everything is working fine.

Moving Your Blogger Feed Subscribers Over To WordPress

If you’ve been using feedburner on your blogger’s blog, all you need to do is to log in to your feedburner account and edit feed details with the new wordpress RSS feed. Your subscribers count remain intact but it’s a different case if you haven’t been using feedburner.

If you’re not using feedburner, you’re going to redirect your old blogger RSS feed address to WordPress RSS feed URL by editing your .htaccess file and pasting the following piece of code on the first line:

#ATOM Feeds
RewriteRule atom.xml feed/atom/ [L,R=301]
RewriteRule feeds/posts/default feed/atom/ [L,R=301]
#RSS FEEDS
RewriteRule feeds/posts/default?alt=rss feed/ [L,R=301]
RewriteRule rss.xml feed/ [L,R=301]
#Comments Feed
RewriteRule /feeds/comments/default comments/feed/ [L,R=301]
RewriteRule /feeds/comments/default?alt=rss comments/feed/ [L,R=301]

Retaining Facebook likes, tweets and other sharing counts

If you intend to change you sharing counts, then you won’t have to change your permalinks. I wanted to change my permalinks to a much nicer one but realized my facebook likes on blog posts reverted back to zero and there was absolutely no way to fix it despite running frantic searches on google.

Removing Your Old blogspot Site From Google Index

First and foremost, I must warn you never to delete your blogger’s blog because your blog images are still hosted on blogger. Notwithstanding, you must remove your blogspot site from google’s index. Why? Having similar contents on the same blog can get you penalized by google and drop your search engine ranking. To remove your blogspot from google, paste this code in the head section of your blog

<meta content=â??NOINDEX, NOFOLLOWâ?? name=â??ROBOTSâ??/>

Now you’re done. Log in to your wordpress blog, get used to the interface and install cool plugins!

Know Issues With Migrating Blog Posts From Blogger To WordPress

While importing my blog posts, I encountered a problem which someone else might come across and that was on Step 6. I saw exactly this error:

The page you have requested cannot be displayed. Another site was requesting access to your Google Account, but sent a malformed request. Please contact the site that you were trying to use when you received this message to inform them of the error. A detailed error message follows:

The site “http://example.com” has not been registered.

The fix for this is registering your domain with google to access all google’s services by following this link: https://www.google.com/accounts/ManageDomains

- Enter your domain name in the box provided, ex., doncaprio.com

- Click on Manage Domain

- Select Alternate Method which is much more easier if you don’t want to mess around with DNS settings.

- You wil be given an HTML file to upload after which you will click the Verify button.

- Add your domain name and description and save

- Save OAuth key and OAuth secrete for your future reference

- Now you domain is registered

How To Change Blogger’s Post Title Format

Posted by tris tecno 0 komentar
If you are one of those with long page titles, you sure won’t like the way your blog shows up on search results with your post title looking so wierd.

By default, blogger’s posts title always places your whole site title before the real post title. If your site title is too long, your real post title containing your keywords might not show up on search results.


Now check this example: here’s a blog with site title as “Tips And Tricks on Building A Better Blog, SEO and Online Money Making” and a blog post titled “How to Make Money Reading Mails“

By Default, the Post title appears like this:

(Tips And Tricks on Building A Better Blog, SEO and Online Money Making : How to Make Money Reading Mails)

But after going through this tutorial, the title will look like this:

(How to Make Money Reading Mails | Tips And Tricks on Building A Better Blog, SEO and Online Money Making)

The second title definitely looks better as the subject matter of the blog post is easily seen. This is also good for search engine optimization. This blogger title swap is a must-do hack for your blog.

1. To change the title, Go to “design

2. Select “Edit HTML

<title><data:blog.title/></title>

If you can’t find that, search for this:

<title><data:blog.pageTitle/></title>

4. Replace completely with:

<b:if cond='data:blog.pageType == "item"'>
<title><data:blog.pageName/> |<data:blog.title/></title>
<b:else/>
<title><data:blog.pageTitle/></title> </b:if>


5. Save your template.

6. View your blog and watch the title swap change your post title format

Now this won’t reflect immediately on search engines as your indexed pages will only be updated when search bots come visiting.

How to show HTML/java codes in blog posts "For Blogger"

Posted by tris tecno 0 komentar
If you’re a blogspot platform blogger and want to show HTML source codes in your blog posts then you must had a hard time how to make it done.


For fix this you have to take two simple steps,

Step 1

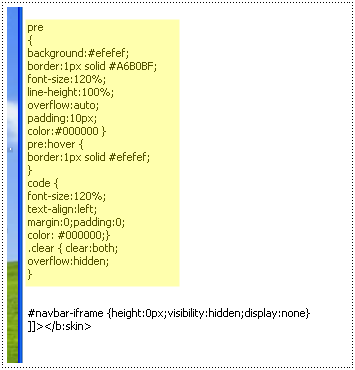
You have to add a special code inside your blogger template. Go to your blogger Dashboard > Layout > Edit HTML. Now hit CTRL+D on your keyboard and search this tag,

]]></b:skin>

Now you have to add this code above that code,

Source BlogKori.Com : How to show HTML/java codes in blogger(blogspot) blog posts with table + Raw HTML converter | BlogKori
Under Creative Commons License: Attribution Share Alike

pre
{
background:#efefef;
border:1px solid #A6B0BF;
font-size:120%;
line-height:100%;
overflow:auto;
padding:10px;
color:#000000 }
pre:hover {
border:1px solid #efefef;
}
code {
font-size:120%;
text-align:left;
margin:0;padding:0;
color: #000000;}
.clear { clear:both;
overflow:hidden;
}

Now it will look something like this,
 

After you done it, click the “Preview” button to see if your blog shows or not. If everything’s okay, then click, “Save template

Step 2

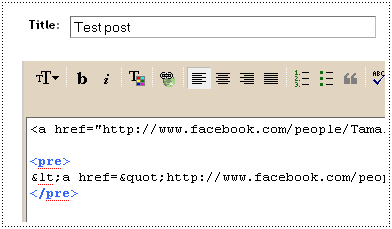
Now each time you create a post and you need to add some HTML codes inside your post, you have to convert it into escapable characters. For this go to this tool called Quick escape and insert your code. Click, “Convert to escaped character” the converted code will be different than the original.

Now create a new blog post and add the converted code. You have to enclosed the code with a “pre” tag(marked as blue) For this I’ve added the same code twice. One normally and the other one with the hack.


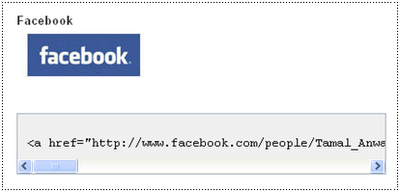
Publish your post and see the magic! The normal code showed up with the effect but the hacked on remained intact inside the table.


Please leave a comment with your response and any suggestion for this blogger hack. If you run into any trouble, feel free to ask me a question. Please do share/save this page if it helped you.

Adding Facebook Like Button To Blog Posts (For Blogger)

Posted by tris tecno 0 komentar
Facebook like button is probably the most important facebook integration to socialize your blog. It allows your blog content to be shared with the click of a button without leaving the page. I recently wrote a post on creating a facebook fan page and adding a like box to your blog and I suggest you check it out if you haven’t. Adding facebook like button involves just a couple of steps easy to implement.
You can add a like button for your fan page or a like button for each and every blog post. There’s an old post I made on adding facebook like button to blog posts but this one explains it even further.

ADDING LIKE BUTTON TO EACH BLOG POST

This makes it a lot easier for your readers to share your blog posts with just a click. To add facebook like button to every blog posts automatically, follow the steps below:

1. Login to your blogger account and select Design

2. Click on Edit HTML

3. Check the box labelled Expand Widget Template

4. Like I always emphasize, back up your template before making changes in case something goes wrong

5. Press CTRL + F and search for <data:post.body/>

If you’re using a magazine style template or used the automatic read more hack I posted, you might find two or more <data:post.body/> in your template. You should try both to know which one works. The second works on my template though.

6. If you prefer to have the facebook like button to appear on top of your blog post right below the title, paste this code above <data:post.body/>

<b:if cond='data:blog.pageType == &quot;item&quot;'><div><iframe allowTransparency='true' expr:src='&quot;http://www.facebook.com/plugins/like.php?href=&quot; + data:post.url + &quot;&amp;layout=standard&amp;show_faces=false&amp;width=100&amp;action=like&amp;font=arial&amp;colorscheme=light&quot;' frameborder='0' scrolling='no' style='border:none; overflow:hidden; width:400px; height:27px;'/></div></b:if> <br/>

7. If you prefer to see the like button below your blog posts, paste this code below <data:post.body>

8. You might as well put it in both positions. Save your template and view the change on your blog.

Note:
You can change the layout written in red which is set to standard by default to button_count if you want the like button to show number of likes instead.

You can as well set show_faces which is false by default to true. This enables the like button to show photos underneath but it applies to the standard button only.

The code above too only shows the like button on post pages. It won’t appear on static pages like label search results and home page. To make the like button appear on static pages involves removing two lines of codes: <b:if cond=’data:blog.pageType == &quot;item&quot;’> and </b:if>.
With those removed, the facebook like button appears on static pages and on blog post pages as well.

Ping your blog, website, or RSS feed for Free